Installing wallpaper can transform any room, but the difference between a professional-looking result and a disappointing failure often comes down to one critical factor: wall preparation. Whether you’re a DIY enthusiast tackling your first wallpaper project or a seasoned renovator, following a comprehensive wall prep checklist ensures your wallpaper will look stunning and last for years to come.
Proper wall preparation isn’t just recommended—it’s essential. Without adequate prep work, even the highest-quality wallpaper can bubble, peel, or fail prematurely. This guide provides everything you need to know about preparing walls for wallpaper installation, from initial assessment to final quality control.
Why Proper Wall Preparation is Critical for Wallpaper Success
The statistics tell a sobering story: approximately 80% of wallpaper failures can be traced back to inadequate wall preparation. When walls aren’t properly cleaned, primed, or repaired before installation, wallpaper adhesive struggles to bond effectively, leading to premature peeling, bubbling, and costly re-installation.
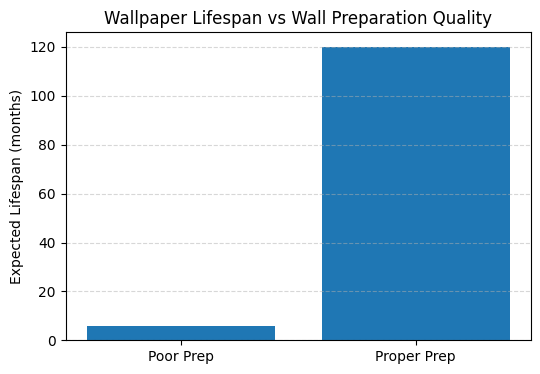
Professional wallpaper installers understand that preparation accounts for roughly 60-70% of the total installation time—and for good reason. A wall that’s been meticulously prepared provides the ideal surface for wallpaper adhesive to create a lasting bond. Conversely, cutting corners during preparation can result in wallpaper failure within months rather than the expected 10-15 year lifespan.
The cost difference between doing it right the first time versus dealing with premature failure is substantial. While proper preparation might add 1-2 days to your project timeline, wallpaper removal and re-installation can cost 3-4 times the original project budget, not including the time and frustration involved.
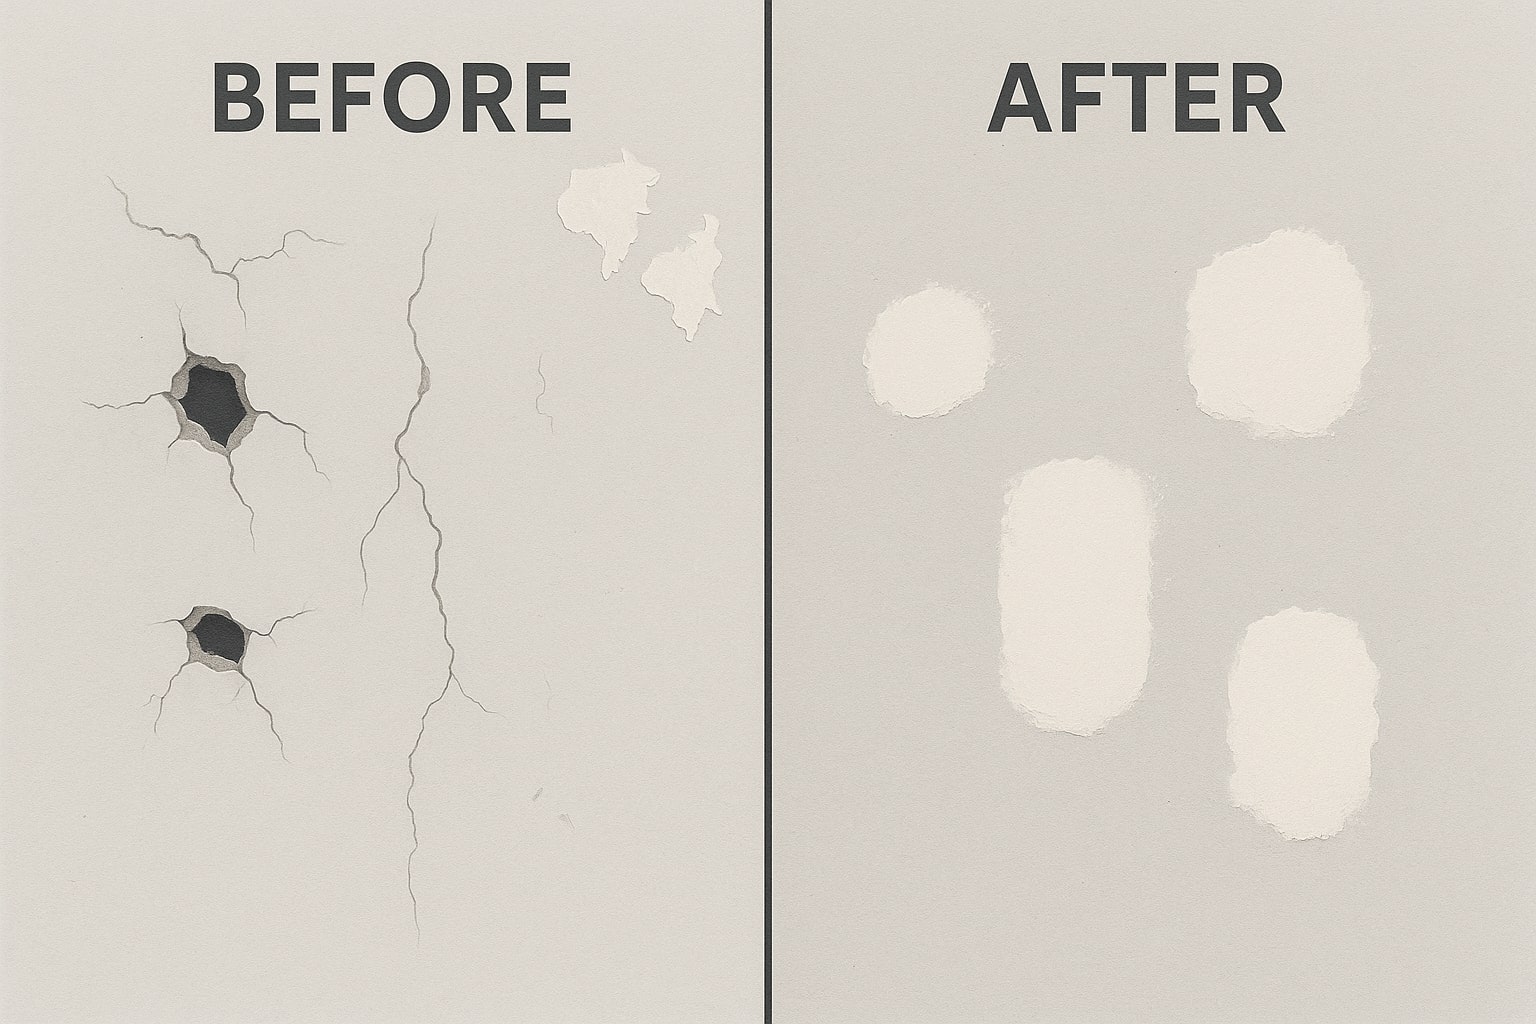
Poor preparation affects more than just adhesion. Inadequately prepared walls can cause visible imperfections to telegraph through the wallpaper, creating an uneven, unprofessional appearance. Dirt, grease, or residue left on walls can also cause discoloration over time, permanently staining your investment.
Essential Tools and Materials for Wall Preparation
Must-Have Tools for Every Wall Type
Success in wall preparation starts with having the right tools. Professional-grade tools not only make the job easier but also ensure more consistent results. Here’s what you’ll need for virtually any wall preparation project:
Surface preparation tools form the foundation of your toolkit. A high-quality putty knife set (2-inch, 4-inch, and 6-inch) handles everything from small crack repairs to large-scale skim coating. A flexible sanding block with 120-grit and 220-grit sandpaper smooths repairs and lightly abrades glossy surfaces for better primer adhesion.
Cleaning equipment ensures surfaces are spotless before primer application. Microfiber cloths provide lint-free cleaning, while a quality degreasing sponge removes stubborn residue. Don’t overlook the importance of a vacuum with brush attachment for removing dust from cracks and crevices.
Measurement and marking tools help maintain accuracy throughout the process. A 25-foot tape measure, 4-foot level, and pencil for light marking ensure your preparation work sets up perfect wallpaper alignment later.
| Tool Category | Essential Items | Approximate Cost |
| Surface Prep | Putty knife set (3 sizes), sanding block, scrapers | $35-50 |
| Cleaning | Microfiber cloths, degreasing sponge, bucket | $15-25 |
| Repair | Spackling compound, mesh tape, caulk gun | $20-35 |
| Application | Primer brush, roller, paint tray | $25-40 |
| Total Investment | $95-150 |
Materials You’ll Need Based on Wall Condition
The specific materials required depend heavily on your wall’s current condition, but certain items appear on virtually every preparation project. Understanding when and why to use each material ensures you purchase exactly what you need without overspending on unnecessary products.
Primers and sealers create the crucial bonding surface between your wall and wallpaper adhesive. Alkyd-based primers work best on previously painted surfaces, while acrylic primers excel on new drywall. For walls with stains or strong odors, consider a specialized blocking primer that prevents bleed-through.
Fillers and repair compounds address imperfections that would otherwise telegraph through finished wallpaper. Lightweight spackling compound handles small holes and cracks, while setting-type joint compound provides superior strength for larger repairs. For areas prone to movement, flexible acrylic caulk prevents future crack development.
Cleaning solutions remove contaminants that interfere with adhesion. Tri-sodium phosphate (TSP) cuts through grease and grime on kitchen or bathroom walls, while a mild detergent solution suffices for most living areas. Always choose solutions compatible with your wall material to avoid damage.
| Primer type | Base | Best use |
|---|---|---|
| Alkyd (oil‑based) | Oil | New drywall; seals porous paper and prevents moisture penetration |
| Acrylic (water‑based) | Water | Previously painted drywall; promotes adhesion for new wallpaper |
| Blocking primers (e.g., Zinsser Cover Stain, BIN) | Oil or shellac | Walls with stains, smoke or odours; prevents bleed‑through |
| Clear sealer (Zinsser Gardz) | Water | Repairs damaged drywall, seals chalky surfaces before primer |
Step-by-Step Wall Preparation Process
Phase 1 – Initial Assessment and Planning
Every successful wallpaper project begins with thorough assessment and planning. This phase determines your material needs, identifies potential challenges, and establishes a realistic timeline for completion.
Start by examining your walls under bright lighting, preferably during daylight hours. Look for obvious damage like holes, cracks, or loose paint, but don’t stop there. Run your hand along the wall surface to detect subtle imperfections that might not be immediately visible. Pay special attention to corners, baseboards, and ceiling lines where previous work might have left irregularities.
Document your findings room by room, noting the type and extent of each issue. Take photos of problem areas—they’ll help when consulting with professionals or shopping for repair materials. This documentation also serves as a quality control reference during the preparation process.
Measure your walls accurately, calculating both total square footage and individual wall dimensions. Add 10% to your material calculations to account for waste and touch-ups. This planning phase also helps you determine realistic timing—most wall preparation requires 2-3 days for proper drying between steps.
Phase 2 – Surface Cleaning and Preparation
Thorough cleaning removes contaminants that prevent proper primer and adhesive bonding. Even walls that appear clean often harbor invisible films of dust, grease, or residue that compromise wallpaper installation.
Begin with basic dust removal using a vacuum with brush attachment, working from top to bottom to avoid re-contaminating cleaned areas. Pay special attention to textured surfaces where dust accumulates in crevices. Follow vacuuming with a light sanding using 220-grit sandpaper to create microscopic texture that improves primer adhesion.
For walls requiring deeper cleaning, choose your cleaning solution based on the type of contamination present. Kitchen walls typically need degreasing with TSP solution, while bathroom walls might require mildew treatment before proceeding. Always test cleaning solutions in an inconspicuous area first to ensure they won’t damage your wall surface.
When removing existing wallpaper, patience prevents wall damage that creates additional repair work. Score the wallpaper surface lightly, then apply removal solution according to manufacturer directions. Allow adequate penetration time before attempting removal—rushing this step often results in gouged drywall that requires extensive repair.

Rinse thoroughly after cleaning to remove all solution residue, then allow walls to dry completely before proceeding. Moisture trapped beneath primer can cause adhesion failure and promote mold growth behind your finished wallpaper.
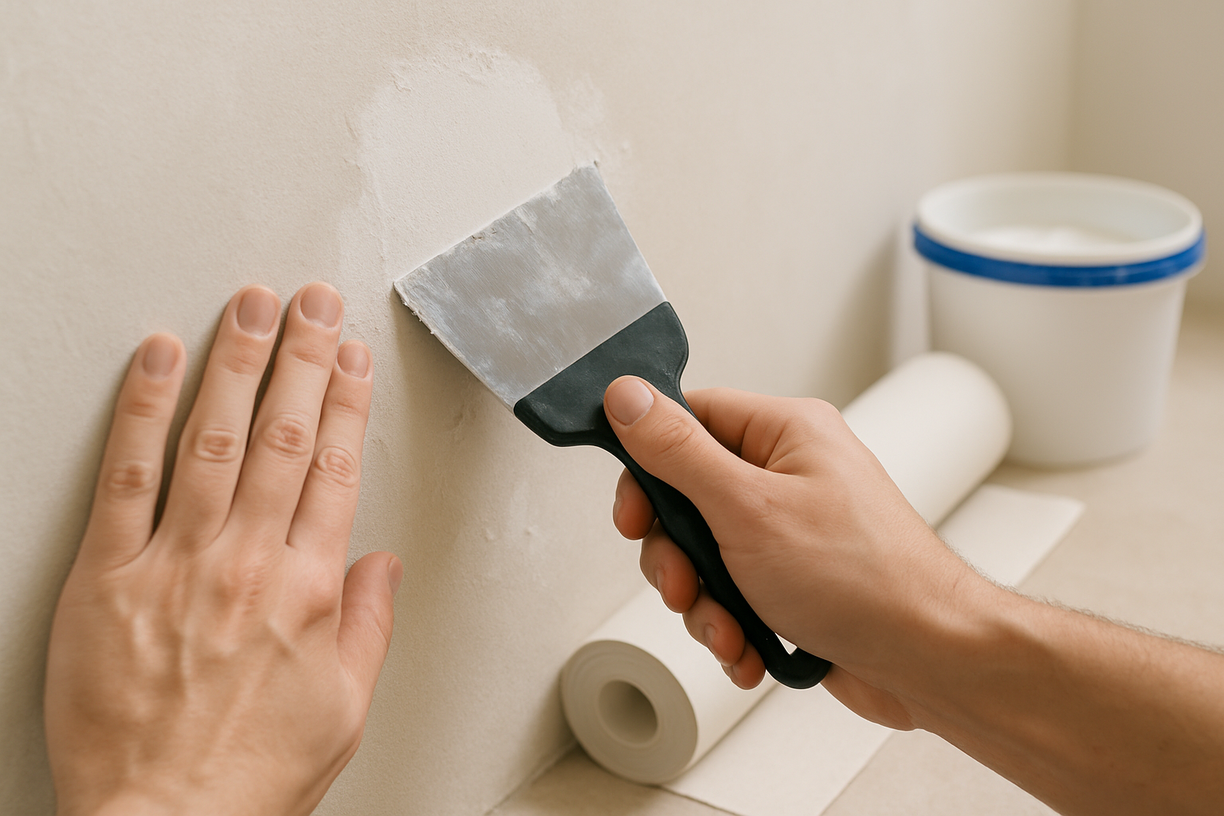
Phase 3 – Repair and Smoothing
Surface repairs form the foundation for professional-looking wallpaper installation. Even minor imperfections become magnified under wallpaper, so thorough repair work at this stage prevents disappointment later.
Small holes and cracks require different approaches based on their size and location. Holes smaller than a nail head can be filled directly with spackling compound, while larger holes need backing material for proper support. Use mesh tape for cracks longer than 6 inches to prevent future movement from reopening the repair.
Apply filler materials in thin layers, allowing each to dry completely before adding the next. Overfilling repairs and sanding back to level produces better results than attempting to achieve perfect coverage in a single application. Pay attention to feathering edges—abrupt transitions between repair material and existing wall surface will show through wallpaper.
Textured surfaces present special challenges for wallpaper installation. Light texture can often be smoothed with careful skim coating, but heavy texture like popcorn ceilings or pronounced orange peel requires complete removal or professional smoothing. Consider the time and effort involved against hiring a professional for extensive texture work.
Sand all repairs with 220-grit sandpaper once fully dry, blending edges seamlessly with surrounding wall surface. Use a bright work light held at a shallow angle to reveal any imperfections—this technique shows exactly what will be visible under finished wallpaper.
Phase 4 – Priming and Final Preparation
Priming creates the optimal surface for wallpaper adhesive bonding while providing insurance against future removal damage. Many DIYers are tempted to skip this step, but proper priming is essential for long-term wallpaper success.
Choose primer based on your specific wall condition. New drywall requires a high-build primer that seals the porous surface and provides uniform porosity for consistent adhesive absorption. Previously painted walls need primer that promotes adhesion between existing paint and wallpaper adhesive. For walls with stains or strong odors, use a blocking primer that prevents bleed-through.
Apply primer using the same techniques you’d use for paint application, maintaining consistent coverage without drips or missed spots. Use a high-quality synthetic brush for cutting in around trim and corners, followed by a 3/8-inch nap roller for field areas. Work in manageable sections to maintain a wet edge and avoid lap marks.
Pay special attention to areas where different materials meet—joint compound, wood trim, and existing paint all absorb primer differently. Apply a second primer coat to areas that appear to absorb the first coat completely, ensuring uniform surface preparation throughout.
Allow primer to cure according to manufacturer specifications before proceeding with wallpaper installation. Rushing this critical drying period can cause wallpaper adhesive to reactivate the primer, leading to poor bonding and potential wallpaper failure.
Wall-Specific Preparation Requirements
Preparing Painted Walls for Wallpaper
Painted walls present unique challenges depending on paint type, age, and condition. The key to success lies in creating proper adhesion between existing paint and wallpaper adhesive while ensuring the paint film remains stable during installation.
Test paint adhesion before committing to your preparation approach. Apply a piece of high-tack tape to the wall surface, press firmly, then remove quickly. If paint comes off with the tape, complete paint removal is necessary before proceeding. Partial paint adhesion failure during wallpaper installation can cause catastrophic wallpaper failure.
Glossy or semi-gloss paint requires surface abrasion to promote primer adhesion. Sand lightly with 220-grit sandpaper or use a liquid deglosser for chemical etching. Focus on creating uniform dullness across the entire surface—missed glossy spots will show as areas of poor wallpaper adhesion.
Oil-based paint creates an excellent base for wallpaper when properly prepared, while latex paint requires more careful handling to prevent reactivation during wallpaper installation. When in doubt about paint type, apply primer to a test area and monitor for any reaction or poor adhesion.
Preparing Drywall and New Construction
New drywall offers the advantage of a clean starting surface but requires specific preparation techniques to ensure optimal wallpaper bonding. Understanding how different drywall materials and finishes affect preparation helps you achieve professional results.
Seal new drywall properly using a high-build primer specifically designed for porous surfaces. Standard paint primers lack the solids content necessary to create uniform porosity across joint compound and drywall paper. Apply primer in thin, even coats rather than attempting to achieve complete coverage in a single heavy application.
Joint compound areas absorb moisture differently than surrounding drywall paper, creating varying rates of wallpaper adhesive absorption. Address this issue with consistent primer application, paying special attention to feathered edges where joint compound meets drywall paper. Consider a second primer coat over joint compound areas if they appear to absorb the first coat completely.
Texture considerations become critical when preparing new drywall for wallpaper. Even “smooth” drywall typically has subtle texture that can affect wallpaper appearance, particularly with thin or metallic wallpapers. Evaluate your wallpaper choice against wall texture—heavily textured walls may require skim coating for optimal results with delicate wallpapers.
Preparing Previously Wallpapered Walls
Removing existing wallpaper and preparing the underlying surface for new wallpaper installation requires patience and proper technique. Rushed removal often creates wall damage that requires extensive repair, ultimately taking longer than careful, methodical removal.
Complete removal techniques vary based on wallpaper type and age. Modern strippable wallpapers often remove cleanly with minimal surface preparation, while older vinyl or fabric-backed wallpapers may require scoring and chemical removal agents. Always start with the gentlest removal method before progressing to more aggressive techniques.
Score wallpaper lightly in a crosshatch pattern to allow removal solution penetration, taking care not to damage underlying drywall. Apply removal solution generously and allow adequate penetration time—typically 15-20 minutes for most wallpapers. Test removal in a corner before treating entire walls to gauge the effectiveness of your chosen method.
Stubborn adhesive residue requires complete removal before primer application. Use a wallpaper removal solution designed for adhesive cleanup, followed by thorough rinsing to remove all residue. Any remaining adhesive will prevent proper primer bonding and can cause wallpaper installation problems.
| Wallpaper Type | Removal Method | Time Required | Special Considerations |
| Strippable Vinyl | Dry removal | 2-4 hours | May leave adhesive residue |
| Traditional Paper | Steam/Solution | 4-8 hours | Risk of wall damage |
| Fabric-backed | Chemical removal | 6-12 hours | Requires thorough cleanup |
| Foil/Metallic | Scoring + Solution | 8-12 hours | High damage risk |
Assess wall damage carefully after wallpaper removal. Common issues include gouged drywall paper, loose joint compound, and adhesive staining. Address all damage completely before proceeding with preparation—wallpaper installation won’t hide underlying problems.
Common Wall Preparation Mistakes to Avoid
Top 5 Preparation Errors That Ruin Wallpaper Projects
Understanding common preparation mistakes helps you avoid pitfalls that can compromise your wallpaper installation. These errors account for the majority of wallpaper failures and are entirely preventable with proper planning and execution.
Insufficient cleaning tops the list of preparation errors. Walls that appear clean often harbor invisible films that prevent proper adhesion. This is particularly common in kitchens where cooking grease creates subtle but significant barriers to wallpaper adhesive bonding. Always clean walls thoroughly, even if they don’t appear dirty.
Skipping primer represents false economy that often costs far more than the saved primer expense. Unprimed walls absorb wallpaper adhesive unevenly, creating weak bonding areas prone to failure. Additionally, unprimed walls make future wallpaper removal nearly impossible without significant wall damage.
Inadequate surface repair shows through finished wallpaper, creating an unprofessional appearance that can’t be corrected without wallpaper removal. Take time to address all surface imperfections during preparation—small issues become major problems once wallpaper is installed.
Poor moisture control during preparation can trap moisture beneath primer or wallpaper, promoting mold growth and adhesion failure. Ensure adequate ventilation during all preparation steps and verify complete drying before proceeding to the next phase.
Rushing the process undermines all other preparation efforts. Each preparation step requires adequate time for proper completion and drying. Rushing drying times or skipping steps to meet deadlines virtually guarantees wallpaper problems later.
Troubleshooting Wall Preparation Challenges
Dealing with Moisture and Humidity Issues
Moisture problems can derail wallpaper projects before installation begins. Identifying and addressing moisture issues during preparation prevents mold growth, adhesion failure, and premature wallpaper deterioration.
Identify moisture problems through visual inspection and moisture testing. Look for water stains, mold growth, or peeling paint that indicates ongoing moisture intrusion. Use a moisture meter to test suspect areas—readings above 15% indicate problems requiring resolution before wallpaper installation.
Address moisture sources before beginning wall preparation. Leaking pipes, poor ventilation, or inadequate exterior sealing can continue causing problems even after wallpaper installation. Fixing the source costs less than repeated wallpaper replacement due to moisture damage.
Proper ventilation during prep accelerates drying and prevents moisture accumulation. Use fans to maintain air circulation, particularly in bathrooms or basements where humidity levels run high. Dehumidifiers can help in extreme cases, but adequate ventilation usually suffices for most projects.
Moisture barrier considerations become important in high-humidity areas like bathrooms or kitchens. Vapor barrier primers help prevent moisture transmission through walls, while proper ventilation prevents accumulation behind wallpaper. Consult manufacturer guidelines for specific moisture barrier requirements with your chosen wallpaper.
Handling Textured Walls and Unusual Surfaces
Textured walls and unusual surfaces require specialized preparation approaches to achieve professional wallpaper installation results. Understanding your options helps you make informed decisions about preparation complexity versus hiring professionals.
Working with popcorn texture presents significant challenges for wallpaper installation. The random texture creates varying contact points that prevent consistent wallpaper adhesion. Complete texture removal followed by skim coating provides the best results, but this represents substantial additional work that may warrant professional assistance.
Test texture removal in an inconspicuous area before committing to full removal. Some popcorn textures contain asbestos and require professional abatement. If removal isn’t feasible, consider alternative wall covering options or professional consultation on specialized installation techniques.
Brick and masonry preparation requires different techniques than standard drywall surfaces. Clean masonry thoroughly to remove efflorescence and dust, then apply appropriate masonry primer. Consider skim coating over brick for smooth wallpaper installation, understanding that this approach makes future wallpaper removal more challenging.
Wood paneling considerations depend on panel type and condition. Groove-and-bead paneling typically requires skim coating for smooth wallpaper installation, while flat paneling may only need proper cleaning and priming. Address any loose panels or protruding nails before beginning preparation work.
Quality Control and Final Inspection
Pre-Installation Inspection Checklist
Thorough quality control before wallpaper installation prevents problems that can’t be corrected without starting over. This final inspection ensures your preparation work meets professional standards and sets up successful wallpaper installation.
Surface smoothness test reveals imperfections that need additional attention. Use a bright work light held at a shallow angle to highlight any remaining bumps, depressions, or repair edges. Run your hand along the wall surface to detect issues that might not be immediately visible. Any imperfection you can feel will likely show through finished wallpaper.
Check repair areas carefully, ensuring they’re completely dry and properly feathered. Sand any rough edges or ridges that could create problems during wallpaper installation. Pay special attention to areas where different materials meet—these transitions must be smooth to prevent wallpaper irregularities.
Cleanliness verification ensures surfaces are ready for adhesive application. Dust from sanding or repair work can interfere with wallpaper bonding, so vacuum all surfaces thoroughly before proceeding. Wipe walls with a tack cloth to remove fine dust particles that vacuuming might miss.
Primer coverage assessment confirms uniform surface preparation across all wall areas. Look for missed spots, thin coverage, or areas where primer has been absorbed completely. Touch up any deficient areas with additional primer, allowing proper drying time before wallpaper installation.
Environmental Conditions for Success
Environmental conditions during preparation and installation significantly impact wallpaper bonding and long-term performance. Maintaining optimal conditions ensures your preparation work translates into successful wallpaper installation.
Optimal temperature and humidity range from 65-75°F with relative humidity between 30-50%. Higher temperatures can cause rapid drying that prevents proper adhesive bonding, while lower temperatures slow drying and can cause condensation problems. High humidity interferes with drying, while very low humidity can cause cracking in repair materials.
Monitor conditions with a digital thermometer/hygrometer, adjusting heating, cooling, or humidity as needed. Avoid dramatic temperature or humidity changes during preparation and installation—gradual adjustments prevent stress on repair materials and primer coats.
Lighting considerations for inspection help identify potential problems before they become visible in finished wallpaper. Natural daylight provides the most accurate color rendition and shadow definition for quality control purposes. Supplement natural light with bright work lights positioned to highlight surface irregularities.
Timing your preparation with installation ensures optimal surface conditions when wallpaper installation begins. Plan preparation completion 24-48 hours before installation starts, allowing adequate curing time while preventing dust accumulation on prepared surfaces. Cover prepared walls if installation must be delayed significantly.
| Category | Checkpoint | Status (✓/✗) |
|---|---|---|
| Surface quality | Walls smooth and even | ☐ |
| All repairs dry and sanded | ☐ | |
| Primer coverage uniform & fully cured | ☐ | |
| Cleanliness | Dust removed from walls & surfaces | ☐ |
| Surrounding area protected from dust | ☐ | |
| Environment | Temperature 65–75 °F (18–24 °C) | ☐ |
| Humidity 30–50 % | ☐ | |
| Materials | Tools organised and ready | ☐ |
| Sufficient wallpaper & adhesive available | ☐ |
Professional vs. DIY: When to Call an Expert
Complex preparation scenarios may warrant professional assistance despite your DIY skills and ambition. Extensive texture removal, structural repairs, or moisture remediation often require specialized tools and expertise that make professional services cost-effective compared to tool purchase and learning curve time.
Consider professional help for walls requiring complete skim coating, especially in high-visibility areas where perfection is critical. Professional plasterers achieve smoother, more consistent results through experience and specialized tools. The cost difference may be justified by time savings and superior results.
Cost-benefit analysis should include your time value, tool costs, and quality expectations. Professional preparation typically costs $2-4 per square foot but includes expertise, proper tools, and warranty protection. Compare this against your time investment, tool purchase costs, and potential re-work expenses for DIY preparation.
Finding qualified professionals requires research and verification of credentials and experience. Look for contractors specializing in wallpaper preparation rather than general painters. Check references, view completed projects, and verify insurance coverage before committing to professional services.
Final Pre-Installation Checklist
24-Hour Pre-Installation Review
The final 24 hours before wallpaper installation provide an opportunity to verify preparation quality and address any last-minute issues. This systematic review prevents installation delays and ensures optimal results.
Surface readiness verification includes final inspection of all repair work, primer coverage, and cleanliness. Check that primer has cured completely—it should feel dry to the touch and show no tackiness when pressed firmly. Verify that all dust and debris have been removed from wall surfaces and surrounding areas.
Examine corners and trim interfaces carefully, ensuring smooth transitions that won’t interfere with wallpaper installation. Check that electrical plates and fixtures are properly positioned and won’t require adjustment during installation.
Tool and material preparation ensures everything needed for installation is readily available. Organize tools systematically and verify that all materials are on hand in sufficient quantities. This preparation prevents delays during time-sensitive installation work.
Environmental condition check confirms that temperature and humidity remain within optimal ranges for installation. Make necessary adjustments 24 hours in advance to allow conditions to stabilize. Avoid dramatic environmental changes during the installation period.
| Category | Checkpoint | Status |
| Surface Quality | Walls smooth and even | ☐ Complete |
| All repairs dry and sanded | ☐ Complete | |
| Primer coverage uniform | ☐ Complete | |
| Cleanliness | Dust removed from all surfaces | ☐ Complete |
| Surrounding area protected | ☐ Complete | |
| Environment | Temperature 65-75°F | ☐ Optimal |
| Humidity 30-50% | ☐ Optimal | |
| Materials | All tools organized and ready | ☐ Ready |
| Sufficient wallpaper and adhesive | ☐ Ready |
Conclusion: Setting Yourself Up for Wallpaper Success
Proper wall preparation forms the foundation for beautiful, long-lasting wallpaper installation. While the process requires time and attention to detail, the investment pays dividends through superior results and extended wallpaper life. Every hour spent on thorough preparation saves multiple hours of potential re-work and ensures your wallpaper investment delivers maximum value.
Remember that preparation accounts for the majority of installation success. Even premium wallpaper installed over poorly prepared walls will fail prematurely, while budget wallpaper applied over properly prepared surfaces can deliver years of beautiful service. Your preparation work directly determines both the immediate appearance and long-term performance of your wallpaper installation.
The techniques and checklists provided in this guide give you the knowledge needed for professional-quality results. Take time to complete each preparation phase thoroughly, resist the temptation to rush critical drying periods, and don’t hesitate to seek professional assistance for complex preparation challenges.
With properly prepared walls, your wallpaper installation becomes a satisfying project that transforms your space beautifully. The next step is selecting quality wallpaper and adhesive appropriate for your prepared surface, then following proper installation techniques to achieve the stunning results your careful preparation work deserves.
Frequently Asked Questions
How long should I wait after priming before installing wallpaper?
Allow primer to cure for a minimum of 24 hours in optimal conditions (65-75°F, 30-50% humidity) before wallpaper installation. However, cure times can extend to 48-72 hours in cooler temperatures or higher humidity. The primer should feel completely dry and show no tackiness when pressed firmly. Oil-based primers typically require longer cure times than water-based formulations. When in doubt, wait an extra day—rushing this step can cause wallpaper adhesive to reactivate the primer, leading to poor bonding and potential installation failure.
Can I wallpaper over lightly textured walls without completely smoothing them?
Light texture like orange peel or subtle knockdown can sometimes be wallpapered successfully, depending on wallpaper type and thickness. Heavier vinyl wallpapers tend to bridge minor texture better than thin papers or grasscloths. However, any texture will be visible through the finished wallpaper to some degree. Test your specific wallpaper in an inconspicuous area first, and consider that texture may become more apparent over time as wallpaper ages and conforms to the surface. For best results, especially with delicate or expensive wallpapers, skim coating to create a smooth surface is recommended.
What’s the difference between wallpaper primer and regular paint primer?
Wallpaper primer is specifically formulated to create optimal adhesion for wallpaper paste while maintaining some porosity for proper adhesive penetration. It typically has higher solids content than paint primer and creates a more uniform surface texture. Paint primer is designed to seal surfaces and provide adhesion for paint, which has different bonding requirements than wallpaper adhesive. Using paint primer under wallpaper can create bonding problems and may make future wallpaper removal extremely difficult. Always use primer specifically labeled for wallpaper applications to ensure proper performance and future removability.
How do I know if my wall preparation was successful before I start hanging wallpaper?
Successful wall preparation should result in surfaces that are completely smooth, uniformly primed, and free of any dust or residue. Run your hand along the wall—you shouldn’t feel any bumps, ridges, or texture variations. Use bright lighting at a shallow angle to reveal any imperfections. The primer should appear uniform in color and sheen across all surfaces with no missed spots or areas of excessive absorption. Perform a “tape test” by applying painter’s tape to the primed surface, pressing firmly, then removing—the primer should remain intact without peeling. Finally, ensure the surface feels completely dry and shows no tackiness when pressed.
Is it worth preparing walls for removable or temporary wallpaper?
Even removable wallpaper benefits from basic wall preparation, though the level required is typically less intensive than traditional wallpaper. Clean walls thoroughly and repair obvious defects, as dirt and imperfections will show through any wallpaper. Light sanding of glossy surfaces improves adhesion for removable products. However, skip primer for most removable wallpapers—the improved adhesion can make “removable” wallpaper surprisingly difficult to remove. Always test removable wallpaper in an inconspicuous area first, especially on painted walls, as some removable adhesives can still damage paint during removal despite manufacturer claims.