Planning and Preparation Before Painting
Before you start painting, it’s essential to plan and prepare properly. Taking time to get your bedroom ready will save you from potential mistakes and ensure a smooth, professional outcome. Here’s how you can get started:
Evaluate Your Bedroom’s Condition
The first step is to inspect your bedroom walls carefully. Check for cracks, chips, holes, or any other imperfections that could affect the final paint job. Identifying and fixing these issues before painting is critical for achieving a smooth finish. Minor imperfections can be patched up with spackling compound, while larger cracks may require more substantial repairs.
Choose the Right Paint Color and Finish
Selecting the perfect color for your bedroom can be challenging, but it’s important to choose a shade that complements the ambiance you’re trying to create. Consider the room’s lighting, size, and existing décor when choosing a color. For example, lighter tones can make a small bedroom feel more spacious, while darker colors create a cozier atmosphere. Also, think about the paint finish—satin or eggshell finishes work well for bedrooms, providing a slight sheen that’s durable yet soft.
Gather Essential Painting Tools
Having the right tools at your disposal is crucial for a successful paint job. Here’s a list of the essential tools you’ll need:
- Rollers: Ideal for covering large wall surfaces.
- Brushes: Necessary for cutting in around edges and trim.
- Painter’s tape: Helps create sharp, clean lines and protects surfaces.
- Drop cloths: Protect your floors and furniture from drips and spills.
- Stir sticks, paint trays, and extension poles: Additional items to assist in the process.
Prepare the Room for Painting
Before opening that first can of paint, take time to prepare the bedroom. Move all furniture out of the room if possible. If not, place it in the center of the room and cover it with drop cloths or plastic sheeting. Make sure to protect the floors as well, and use painter’s tape to cover trim, windows, and other surfaces that you don’t want to be painted. Also, clean the walls to remove dust, dirt, and oils that could prevent the paint from adhering properly. A simple mix of water and mild soap will do the trick.
Surface Preparation Checklist
Proper surface preparation is key to achieving a flawless paint finish. If you skip these steps, the paint might not adhere well or could result in a bumpy, uneven surface. Here’s what you need to do to ensure the walls are ready for painting.
Sand and Scrape the Walls
Start by sanding and scraping the walls to remove any old paint, debris, or rough spots. This step ensures that the new paint will go on smoothly and stick better. Use sandpaper or a sanding block to smooth out any uneven areas, particularly around patched spots or where old paint has peeled.
Repair Cracks and Holes
Next, look for any cracks, holes, or imperfections in the walls. Use filler or spackling compound to patch them up. Apply the compound with a putty knife, and once it’s dry, sand it smooth so that the repaired area blends seamlessly with the rest of the wall. This step ensures that you won’t see any blemishes through the new paint.
Clean the Walls Thoroughly
Cleaning the walls is a crucial step that is often overlooked. Dust, dirt, and grease can prevent paint from adhering properly to the surface. Use a damp sponge or cloth and a mixture of mild soap and water to wipe down the entire wall. For tougher stains or greasy spots, use a stronger cleaner like trisodium phosphate (TSP). Allow the walls to dry completely before moving on to painting.
By thoroughly preparing the walls, you’ll create a smooth, clean canvas that will result in a high-quality, long-lasting paint job.
Applying Painter’s Tape and Priming
To achieve a professional-looking paint job, applying painter’s tape and priming the walls are two important steps that should not be overlooked. These tasks help ensure clean lines and a uniform finish, preventing common issues like uneven paint or color bleed.
Use Painter’s Tape for Clean Lines
Painter’s tape is essential for creating sharp, clean edges when painting around trim, windows, doors, and other surfaces that should not be painted. Here’s how to apply it effectively:
- Start by cleaning the surfaces where the tape will be applied to ensure proper adhesion.
- Unroll the tape and carefully press it along the edges of the area you want to protect. Make sure the tape is smooth and pressed firmly to prevent paint from bleeding underneath.
- Use long, continuous strips of tape rather than multiple small pieces, as this reduces the chance of gaps.
- Once your painting is complete and the paint is still slightly wet, carefully remove the tape at a 45-degree angle to avoid tearing the paint.
By taking the time to apply painter’s tape properly, you’ll achieve crisp, professional lines that enhance the overall appearance of the room.
When to Use Primer
Primer serves as the foundation for your paint, helping it adhere better to the surface and ensuring even coverage, especially on new or previously damaged walls. You should use primer in the following situations:
- New Drywall: Primer is essential to seal the porous surface of new drywall.
- Significant Repairs: If you’ve patched holes or cracks, primer will help cover those areas evenly.
- Drastic Color Changes: If you’re painting a lighter color over a dark one (or vice versa), primer helps prevent the old color from showing through.
- Stains: Use a stain-blocking primer to cover water damage, mold, or other marks that regular paint can’t conceal.
To apply primer, follow these steps:
- Stir the Primer: Ensure it’s well-mixed for even application.
- Use a Roller and Brush: Apply primer to large areas with a roller, and use a brush for cutting in around the edges and corners.
- Let It Dry Completely: Depending on the type of primer, this can take a few hours. Always check the manufacturer’s instructions for drying times.
Priming properly sets the stage for your top coat of paint to look smooth and vibrant, creating a professional-quality finish.
Painting the Bedroom Walls
Once your room is prepped, it’s time to start painting. The key to a smooth, professional finish is to follow the correct order and technique when applying paint. Let’s dive into the best approach for painting your bedroom walls.
Start with the Ceiling
It’s always best to begin painting with the ceiling before moving on to the walls. This method prevents drips or splatters from falling onto freshly painted walls and ensures a seamless look between ceiling and wall edges. Here’s how to do it:
- Use a Roller with an Extension Pole: This allows you to reach the ceiling comfortably without using a ladder. A roller with a thicker nap is ideal for covering large ceiling areas.
- Cut In Around the Edges First: Use a brush to paint along the edges of the ceiling, where the roller won’t reach. This step ensures you get a clean line where the ceiling meets the walls.
- Roll in Sections: Work in small sections, starting from one corner and rolling outward in overlapping strokes. This technique ensures even coverage.
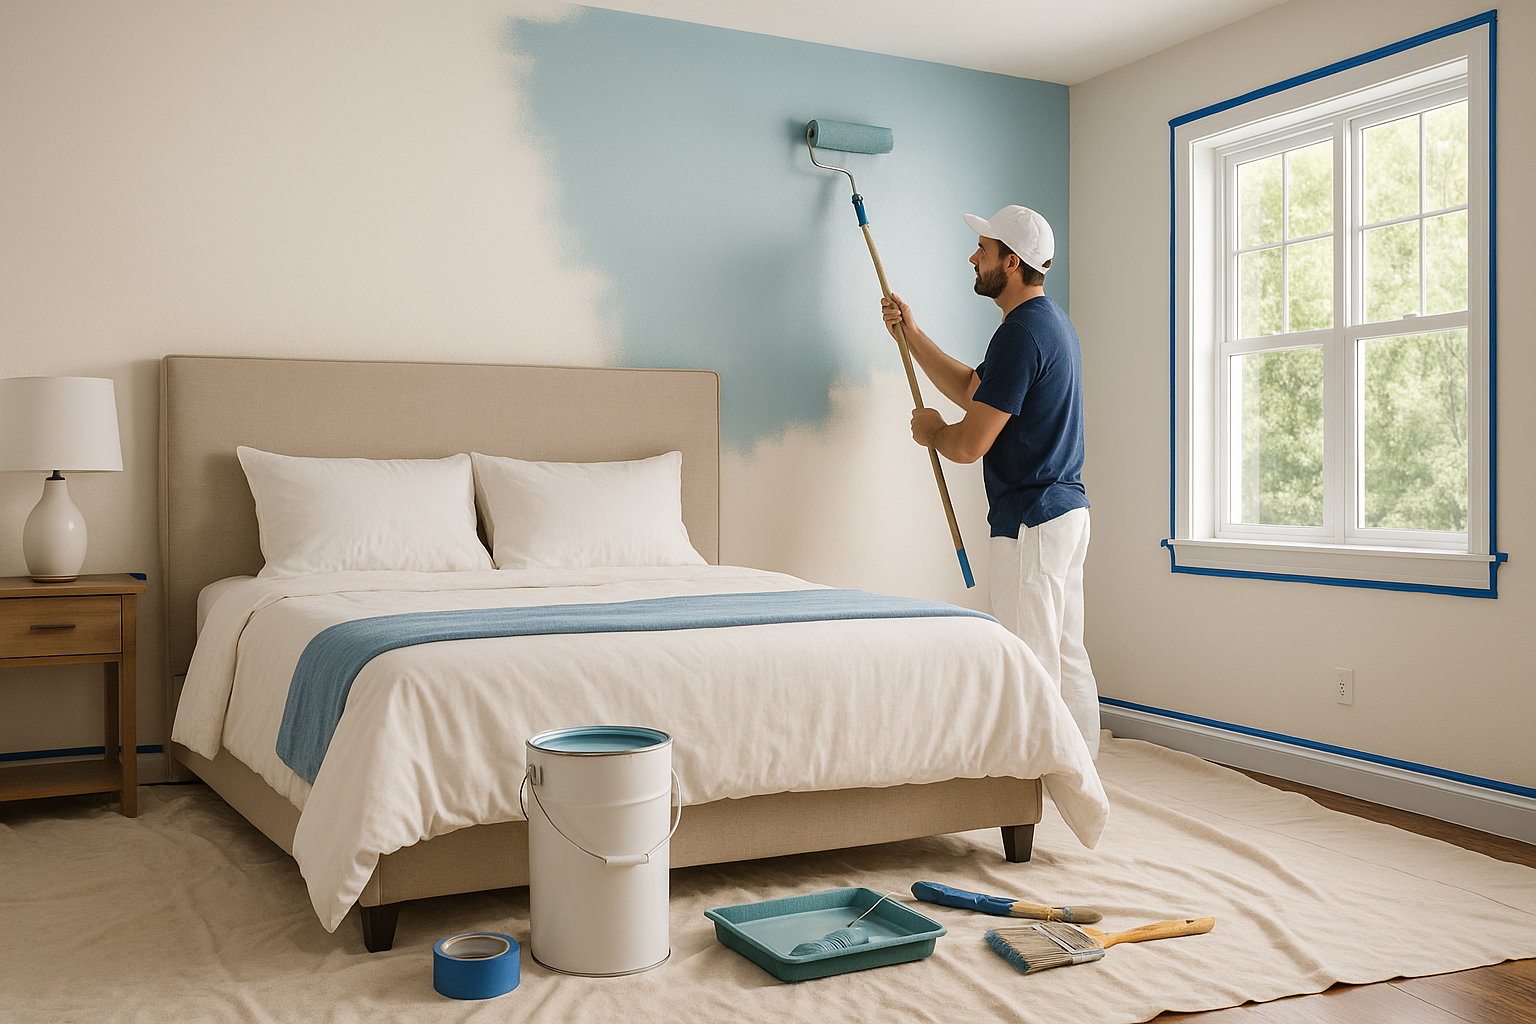
Painting the Walls in Sections
Once the ceiling is dry, you can move on to painting the walls. The key is to divide the walls into sections for better control and coverage. Follow these steps for a perfect paint job:
- Cut In First: Using a brush, paint along the edges of the walls, including around doors, windows, and trim. This process, known as “cutting in,” ensures clean edges where the roller can’t reach.
- Use a Roller for Large Areas: After cutting in, use a roller to cover the larger wall surfaces. Start at the top of the wall and roll downward in a “W” or “M” motion, then fill in the gaps. This technique helps distribute the paint evenly.
- Work in Small Sections: Focus on one wall or part of a wall at a time to ensure even coverage and avoid overlapping dry and wet paint.
Let the Paint Dry Between Coats
Once you’ve applied the first coat, patience is key. Allow enough drying time before applying the second coat to prevent uneven texture or peeling. Here’s what to keep in mind:
- Check Drying Times: Most paints require 2-4 hours to dry between coats, but this varies depending on the type of paint and environmental conditions like humidity.
- Test Before Reapplying: Lightly touch the painted surface to ensure it’s dry to the touch. If the paint feels tacky, wait longer.
- Apply a Second Coat: For optimal coverage and durability, applying a second coat of paint is often necessary, especially when covering a darker color or if the first coat looks uneven.
By following these steps, you’ll ensure a smooth, flawless finish that makes your bedroom look professionally painted.
Painting Details and Trim
Once the main walls are painted, it’s time to focus on the details, like window frames, doorways, and trim. These areas require more precision to ensure a smooth, streak-free finish. Here’s how to tackle the smaller, more intricate parts of your bedroom.
Painting Window Frames, Doorways, and Trim
Painting trim and detailed areas such as window frames and doorways requires careful technique to avoid visible brush strokes or uneven coverage. Follow these steps for a flawless finish:
- Use a High-Quality Angled Brush: An angled sash brush, typically 1-2 inches wide, is ideal for cutting in and painting straight lines on trim and frames. Its design helps you navigate corners and edges with precision.
- Paint in Long, Smooth Strokes: Start at one end of the trim and paint in long, continuous strokes, following the grain of the wood if applicable. Avoid stopping midway, as this can cause streaks or uneven application.
- Don’t Overload the Brush: Dip just the tip of your brush into the paint and tap off excess. Overloading the brush with paint can lead to drips and streaks.
- Work Slowly and Steadily: Take your time to ensure accuracy. Touch up any areas where paint drips or excess paint builds up to maintain a smooth finish.
Painting Around Fixtures and Outlets
Painting around fixtures, light switches, and outlets can be tricky due to their tight spaces. Here’s how to navigate these areas without making a mess:
- Remove Outlet Covers and Switch Plates: Before you start painting, unscrew and remove all outlet covers and switch plates. This prevents paint from getting on them and makes it easier to paint the surrounding area.
- Use a Small Brush for Tight Spaces: A smaller brush, such as a ½-inch artist’s brush, allows you to get into tight corners and around fixtures without getting paint on them.
- Apply Painter’s Tape Around Fixtures: For light fixtures, use painter’s tape to mask off the edges, ensuring that paint doesn’t get on the fixture itself. Be sure to press the tape down firmly to avoid paint bleed.
- Be Patient: Take your time when working around these areas to avoid any errors that could require touch-ups later.
By following these techniques, you’ll achieve a neat, streak-free finish in all the detailed areas of your bedroom.
Post-Painting Cleanup Checklist
After the painting is done, it’s crucial to clean up properly to maintain your tools, ensure the room looks perfect, and avoid any damage to surfaces. Follow this checklist to make the post-painting process quick and efficient.
Cleaning Your Brushes and Rollers
Properly cleaning your brushes and rollers after painting will extend their lifespan and ensure they’re ready for the next project. Here’s how to clean them effectively:
- Remove Excess Paint: Before cleaning, scrape off any excess paint using the edge of the paint can or a brush comb.
- Rinse with Warm Water: For water-based paints, run warm water over the brushes and rollers. Use your fingers or a brush comb to remove the paint from the bristles or roller nap.
- Use Soap if Necessary: For stubborn paint, use a small amount of mild soap. Gently work the soap into the bristles or roller and rinse until the water runs clear.
- Dry Thoroughly: Shake out excess water and lay the brushes flat or hang them to dry, ensuring the bristles maintain their shape.
Removing Painter’s Tape Without Damage
Removing painter’s tape too quickly or carelessly can cause the paint to peel. Follow these steps to safely remove it:
- Wait for the Paint to Dry: Let the paint dry to the touch, usually a couple of hours, but don’t wait too long, as the tape might become difficult to remove.
- Pull at a 45-Degree Angle: Start at a corner and gently pull the tape back at a 45-degree angle. This reduces the risk of pulling up the paint along with the tape.
- Use a Utility Knife for Stuck Tape: If the tape seems stuck, run a utility knife along the edge to separate the tape from the paint cleanly.
Inspecting the Room for Touch-Ups
Once the tape is removed, it’s time to inspect your work and check for any spots that might need touch-ups:
- Check in Natural and Artificial Light: Look at the walls from different angles and under various lighting conditions to spot any missed areas or uneven paint.
- Fix Imperfections: Use a small brush to fill in any spots that didn’t get full coverage or where paint has been applied too thinly. If you notice any drips or thick areas, lightly sand them down and apply a fresh coat of paint.
- Blend the Touch-Ups: Feather the edges of your touch-up areas to blend them seamlessly with the rest of the wall.
By following this post-painting cleanup checklist, you’ll ensure that your tools are properly maintained and that your newly painted bedroom looks flawless.
Final Touches and Maintenance
Now that your bedroom is freshly painted, it’s time to put everything back in place and ensure the walls stay in great condition. Follow these guidelines to protect your new paint job and make sure it lasts.
Rearranging Furniture and Decor
When returning furniture and décor to the room, take extra care to avoid damaging the new paint. Fresh paint may feel dry to the touch, but it can take several days to fully cure. Here are a few tips to protect your work:
- Wait 24-48 Hours: Allow at least 24-48 hours for the paint to dry fully before moving furniture back into the room. If possible, wait longer for heavy items.
- Use Felt Pads: Attach felt pads to the bottoms of furniture legs to prevent scratches or marks on the walls.
- Lift, Don’t Drag: Always lift furniture into place instead of dragging it across the floor, which can cause accidental bumps or scrapes.
- Keep Furniture Slightly Away from Walls: Position furniture an inch or two away from the walls to avoid scuffing the fresh paint.
How to Maintain Freshly Painted Walls
To keep your newly painted walls looking fresh and vibrant, it’s essential to clean and maintain them properly. Here’s how:
- Dust Regularly: Use a microfiber cloth or duster to remove dust from the walls, especially around doorways and windows where dirt tends to accumulate.
- Clean Spills and Stains Quickly: If something spills on the wall, clean it up as soon as possible using a damp cloth and mild detergent. Avoid scrubbing too hard, especially on matte or eggshell finishes.
- Use Gentle Cleaners: For tougher stains, use a cleaner that’s safe for painted surfaces. Always test in an inconspicuous area first to make sure it won’t damage the paint.
Common Bedroom Painting Mistakes to Avoid
Avoiding common mistakes during the painting process can save time and frustration while ensuring a professional-quality finish. Here are two major errors to watch out for.
Skipping Surface Preparation
Proper surface preparation is essential for a long-lasting, professional finish. Skipping this step can lead to several issues:
- Peeling Paint: Without proper cleaning, sanding, and priming, the paint won’t adhere well to the surface, which can cause it to peel or flake over time.
- Visible Imperfections: Cracks, holes, and bumps that aren’t repaired before painting will still be visible under the new paint, detracting from the overall look of the room.
Using the Wrong Paint for the Room
Selecting the correct type of paint for your bedroom is vital for both appearance and durability. Here’s how using the wrong type of paint can impact your project:
- Durability: If you choose a paint with the wrong finish, such as a high-gloss paint in a bedroom, it may show imperfections more clearly and wear down faster in areas like walls that see frequent contact.
- Appearance: Different paint finishes (matte, satin, eggshell, etc.) offer different levels of sheen and durability. Using a finish that’s too glossy or too flat can make the room look inconsistent or less polished.
By keeping these common mistakes in mind, you’ll avoid headaches down the line and achieve a paint job that looks great and lasts.
Conclusion
Recap of the Bedroom Painting Process
Painting a bedroom can transform the look and feel of the space, but achieving a professional-quality finish requires following a series of important steps. Here’s a quick recap of the process to ensure success:
- Planning and Preparation: Assess the condition of your walls, choose the right paint color and finish, gather essential tools, and prepare the room by moving furniture and covering surfaces.
- Surface Preparation: Sand and scrape the walls, repair cracks and holes, and thoroughly clean the walls for better paint adhesion.
- Apply Painter’s Tape and Prime: Use painter’s tape for clean lines around trim and edges. Apply primer if necessary, especially on new or heavily repaired walls.
- Painting the Walls: Start with the ceiling, then paint the walls in sections using the cutting-in technique for edges. Let the paint dry fully between coats.
- Paint Details and Trim: Use precision tools for painting window frames, doorways, and other detailed areas. Be careful around fixtures and outlets.
- Post-Painting Cleanup: Clean your brushes and rollers, remove painter’s tape at the right time, and inspect the room for any touch-ups.
- Final Touches and Maintenance: Wait until the paint is fully dry before rearranging furniture, and take measures to protect the walls and maintain the fresh paint job.
By following these steps, you’ll be able to complete your bedroom painting project with confidence, resulting in a beautifully refreshed space.
FAQs
How long should I wait before sleeping in a freshly painted bedroom?
It’s recommended to wait at least 24-48 hours before sleeping in a freshly painted room, depending on ventilation and the type of paint used. Make sure the room is well-ventilated to reduce paint fumes.
What’s the best type of paint finish for bedrooms?
A satin or eggshell finish is often best for bedrooms. These finishes provide a slight sheen that’s easy to clean while maintaining a soft, inviting look.
Can I use a single coat of paint if I’m short on time?
While one coat may be sufficient in some cases, especially with high-quality paint, applying two coats ensures even coverage and better durability, especially when covering darker colors.
How do I fix mistakes after the paint has dried?
To fix mistakes such as drips, uneven spots, or missed areas, lightly sand the area once the paint is dry and apply a touch-up coat of paint.
How should I protect my newly painted walls from furniture scratches?
Use felt pads on furniture legs and keep furniture slightly away from the walls. Also, avoid dragging furniture across the floor to prevent accidental bumps or scuffs on the freshly painted surface.