Proper cleaning of painting tools is essential for several reasons. First, it extends the lifespan of the tools, ensuring that they remain effective for future projects. Clean tools provide a smoother, more consistent application of paint, leading to better results. Additionally, maintaining clean tools can save money in the long run, as you won’t need to replace them as frequently. Finally, proper cleaning helps prevent contamination of colours, ensuring that your next project starts with pristine equipment.
Overview of Common Painting Tools
There are several key tools commonly used in painting projects:
- Brushes: Available in various sizes and bristle types, including synthetic and natural.
- Rollers: Used for covering large areas quickly and evenly.
- Paint Trays: Hold the paint and allow for even loading of brushes and rollers.
- Scrapers and Edgers: Used for removing old paint and creating clean edges.
- Buckets and Mixing Containers: Essential for mixing paints and cleaning tools.
Understanding the proper cleaning methods for each type of tool is crucial for maintaining their functionality and ensuring high-quality painting outcomes.
Preparing for Cleaning
Necessary Supplies
List of Required Cleaning Supplies To effectively clean painting tools, you’ll need the following supplies:
- Warm water
- Mild dish soap
- Solvents (such as mineral spirits for oil-based paints)
- Wire brush or comb for cleaning brushes
- Old rags or paper towels
- Plastic or metal containers for soaking tools
- Rubber gloves to protect your hands
Having these supplies on hand will make the cleaning process more efficient and thorough.
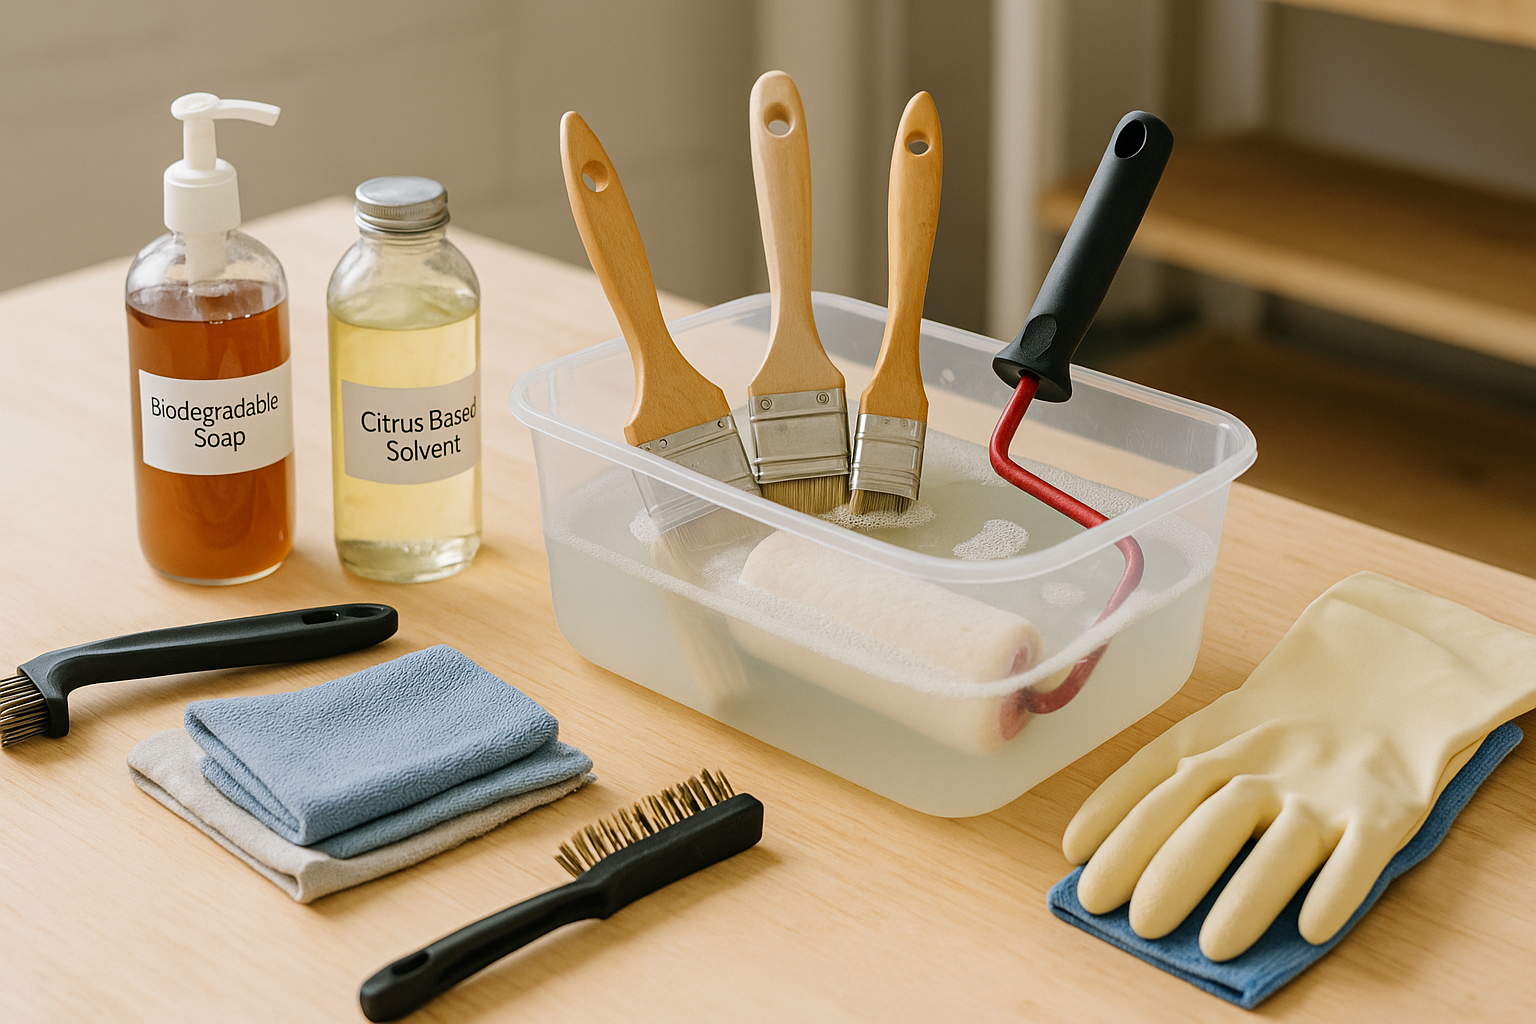
Eco-friendly Alternatives For those looking to minimize their environmental impact, consider the following eco-friendly alternatives:
- White vinegar: Effective for cleaning brushes and removing paint.
- Citrus-based solvents: A natural alternative to harsh chemicals for cleaning oil-based paints.
- Biodegradable soaps: Gentle on tools and the environment.
- Reusable rags: Instead of disposable paper towels, opt for washable rags.
Using eco-friendly supplies can reduce your environmental footprint while still achieving clean, well-maintained tools.
Setting Up a Cleaning Station
Best Locations Choose a location for cleaning that has good ventilation and easy access to water. Ideal spots include:
- A utility sink or laundry room
- Outdoor spaces, such as a backyard or patio
- Garage or workshop areas
Ensure that the area is well-lit and has enough space to lay out your tools for drying.
Safety Precautions When setting up your cleaning station, consider the following safety precautions:
- Wear rubber gloves to protect your skin from solvents and detergents.
- Use eye protection if handling harsh chemicals.
- Ensure good ventilation to avoid inhaling fumes, especially when using solvents.
- Keep cleaning supplies out of reach of children and pets.
- Dispose of used solvents and paint residue properly, following local regulations.
By setting up a safe and organized cleaning station, you’ll be better prepared to clean your tools efficiently and effectively.
Cleaning Different Types of Brushes
Synthetic Brushes
Step-by-Step Cleaning Process
- Rinse Immediately: As soon as you finish painting, rinse the brush under warm running water to remove excess paint.
- Use Mild Soap: Apply a small amount of mild dish soap to the bristles and work it in with your fingers or a brush comb.
- Rinse Thoroughly: Rinse the brush again under warm water, making sure all soap and paint residue are gone.
- Remove Remaining Paint: Use a wire brush or brush comb to remove any remaining paint from the base of the bristles.
- Shape the Brush: Gently reshape the bristles with your fingers to maintain their original form.
- Dry Properly: Lay the brush flat on a towel or hang it with the bristles facing down to dry completely.
Natural Bristle Brushes
Step-by-Step Cleaning Process
- Rinse with Solvent: For oil-based paints, rinse the brush in an appropriate solvent like mineral spirits.
- Use Soap and Water: After solvent cleaning, wash the brush with mild soap and warm water.
- Work the Soap In: Massage the soap into the bristles with your fingers, ensuring deep penetration to remove all paint.
- Rinse Thoroughly: Rinse under warm running water until the water runs clear and all soap is removed.
- Comb the Bristles: Use a brush comb to remove any paint stuck near the ferrule and to realign the bristles.
- Reshape and Dry: Reshape the bristles and lay the brush flat on a towel or hang it with the bristles down to dry.
Tips for Removing Tough Paint
- Soak in Solvent: For hardened paint, soak the brush in a suitable solvent for 30 minutes to an hour.
- Use a Brush Comb: After soaking, use a brush comb or wire brush to gently loosen and remove the paint.
- Repeat if Necessary: If the paint is still not coming off, repeat the soaking and combing process.
- Avoid Harsh Chemicals: Be cautious with strong chemicals as they can damage the bristles over time.
Cleaning Rollers
Removing Excess Paint
Best Techniques
- Scrape Off Paint: Use a paint scraper to remove excess paint from the roller. Scrape over the paint tray or a bucket to catch the paint.
- Roll on Newspaper: Roll the roller on old newspaper or a disposable surface to remove as much paint as possible.
- Use a Roller Cleaner: If available, use a roller cleaning tool that fits over the roller to squeeze out excess paint.
Deep Cleaning Methods
Using Soap and Water
- Rinse in Warm Water: Rinse the roller under warm running water to remove as much paint as possible.
- Apply Soap: Apply a few drops of mild dish soap directly to the roller and work it into the nap with your hands.
- Rinse Thoroughly: Continue to rinse under warm water, squeezing and rolling the roller to remove all soap and paint.
- Repeat if Needed: Repeat the process until the water runs clear and the roller is free of paint.
Using Solvents for Oil-Based Paints
- Soak in Solvent: Place the roller in a container of mineral spirits or another appropriate solvent.
- Work the Solvent In: Use your hands or a brush to work the solvent into the roller’s nap.
- Rinse with Water: After the paint is removed, wash the roller with soap and warm water to remove the solvent.
- Dry Thoroughly: Squeeze out excess water and let the roller air dry completely before storing.
Cleaning Paint Trays
Disposable vs. Reusable Trays
Disposable Trays
- Convenience: Disposable trays are convenient because you can simply throw them away after use, eliminating the need for cleaning.
- Cost: While they save time, the cost of continuously buying disposable trays can add up.
- Environmental Impact: Frequent use of disposable trays contributes to environmental waste.
Reusable Trays
- Durability: Reusable trays are typically more durable and can withstand multiple uses.
- Cost-Effective: Over time, using reusable trays can save money as you won’t need to keep purchasing new ones.
- Environmental Benefits: Reduces waste and is a more environmentally friendly option.
Step-by-Step Cleaning Process
- Remove Excess Paint: Pour any remaining paint back into the paint can. Use a scraper to remove as much paint as possible from the tray.
- Rinse with Warm Water: Rinse the tray under warm running water to remove loose paint.
- Apply Soap: Apply a few drops of mild dish soap to the tray and scrub with a brush or sponge.
- Scrub Thoroughly: Focus on the corners and ridges where paint tends to build up. Use a stiff brush if needed.
- Rinse and Repeat: Rinse the tray again under warm water. Repeat the scrubbing process if necessary until the tray is clean.
- Dry Completely: Allow the tray to air dry completely before storing it.
Preventing Paint Build-Up
- Use Tray Liners: Consider using disposable liners inside reusable trays. This makes cleaning easier and extends the life of the tray.
- Clean Immediately: Clean the tray as soon as you finish painting to prevent paint from drying and hardening.
- Regular Maintenance: Even if you’re using liners, clean the tray periodically to prevent any residual build-up.
Cleaning Other Painting Tools
Paint Scrapers
Removing Residual Paint
- Scrape Off Paint: Use the scraper to remove any excess paint from surfaces and tools.
- Soak in Solvent: For stubborn paint, soak the scraper in a solvent to loosen the residue.
- Use a Wire Brush: Scrub the scraper with a wire brush to remove remaining paint particles.
Maintaining Sharpness
- Regular Sharpening: Use a sharpening stone or file to keep the scraper blade sharp.
- Store Properly: Store the scraper in a dry place to prevent rust and damage.
- Inspect for Damage: Regularly inspect the blade for nicks and replace if necessary.
Paint Edgers
Best Cleaning Practices
- Remove Excess Paint: Wipe off any excess paint from the edger with a rag or paper towel.
- Rinse with Water: Rinse the edger under warm running water immediately after use.
- Use Soap: Apply mild dish soap and scrub with a brush to remove any remaining paint.
- Rinse and Dry: Rinse thoroughly and allow to air dry completely before storing.
Cleaning Paint Buckets
Easy Cleaning Tips
- Pour Out Excess Paint: Pour any leftover paint back into the can or a storage container.
- Scrape the Sides: Use a paint scraper to remove as much paint as possible from the bucket’s sides.
- Rinse with Water: Rinse the bucket with warm water to remove loose paint.
- Use Soap and Brush: Add a few drops of mild dish soap and scrub the inside of the bucket with a brush.
- Rinse and Repeat: Rinse under warm water and repeat the scrubbing process if necessary until the bucket is clean.
- Dry Thoroughly: Allow the bucket to air dry completely before storing or using it again.
By following these best practices for cleaning your painting tools, you can extend their lifespan, maintain their effectiveness, and ensure high-quality results for your future projects.
Storing Painting Tools
Proper Drying Techniques
- Air Drying: After cleaning, ensure all tools are air-dried thoroughly. Lay brushes and rollers flat on a clean towel or hang them with the bristles facing down to prevent water from accumulating in the ferrule or handle.
- Use a Brush Holder: For brushes, use a brush holder that suspends the brush with the bristles facing down, allowing water to drip away from the ferrule and ensuring even drying.
- Avoid Heat Sources: Do not use heat sources like hairdryers or direct sunlight to speed up drying, as this can damage the tools.
Safe Storage Solutions
Hanging Brushes
- Install Hooks: Install hooks or pegs on a wall or inside a cabinet to hang brushes by their handles.
- Use Brush Holders: Utilize brush holders that allow brushes to hang bristles down to maintain their shape and prolong their lifespan.
- Separate Brushes: Ensure brushes are not touching each other while drying to prevent deformation of bristles.
Storing Rollers
- Use Roller Covers: Place cleaned rollers in breathable roller covers to protect them from dust and debris.
- Horizontal Storage: Store rollers horizontally on a flat surface or a shelf to maintain their shape.
- Avoid Compression: Do not place heavy objects on top of stored rollers to prevent flattening or misshaping.
Tips for Quick Clean-Ups
Between Paint Coats
- Wrap in Plastic: Wrap brushes and rollers in plastic wrap or aluminum foil to keep them moist and prevent paint from drying between coats.
- Use a Plastic Bag: Place wrapped tools in a sealed plastic bag and store them in the refrigerator for short periods to extend their usability.
- Cover Paint Trays: Cover paint trays with plastic wrap or a damp cloth to prevent the paint from drying out.
End of Day Clean-Ups
- Rinse Thoroughly: Rinse brushes and rollers under warm water or the appropriate solvent to remove as much paint as possible.
- Quick Soap Wash: Give tools a quick wash with mild soap and water to ensure they are clean and ready for the next use.
- Store Properly: Follow proper drying and storage techniques to maintain tool quality overnight.
Post-Project Cleaning
- Deep Clean: Perform a thorough cleaning of all tools using the appropriate methods for each type (brushes, rollers, trays).
- Inspect Tools: Check for any damage or wear and tear. Replace or repair tools as needed.
- Store Efficiently: Ensure all tools are completely dry before storing them in their designated places to prevent rust, mold, and damage.
By following these guidelines for storing and quickly cleaning your painting tools, you can ensure their longevity and maintain their performance for future projects. Proper maintenance and storage not only protect your investment but also contribute to more efficient and higher-quality painting results.
Troubleshooting Common Cleaning Issues
Hardened Paint on Brushes
Soaking Methods
- Vinegar Soak: For water-based paints, soak the brush in a jar of white vinegar for about an hour. After soaking, use a brush comb or wire brush to remove softened paint.
- Solvent Soak: For oil-based paints, soak the brush in mineral spirits or paint thinner. Let it sit for 30 minutes to an hour. Then, work the solvent through the bristles and comb out the loosened paint.
- Hot Water and Soap: For less severe cases, soak the brush in hot soapy water for 30 minutes, then scrub with a brush comb.
Sticky Rollers
Solvent Solutions
- Mineral Spirits: Soak sticky rollers in mineral spirits for oil-based paints. Let them sit for about 30 minutes, then rinse thoroughly with warm water.
- Alcohol Solution: For water-based paints, use a mixture of isopropyl alcohol and water. Soak the roller for 15-20 minutes and then rinse well.
- Dish Soap and Warm Water: Apply dish soap directly to the roller and work it into the fibers. Rinse with warm water until the roller is no longer sticky.
Paint Residue in Trays
Scraping Techniques
- Plastic Scraper: Use a plastic paint scraper to remove dried paint from the tray. This prevents damage to the tray surface.
- Soak and Scrub: Soak the tray in warm soapy water for 30 minutes to loosen the residue. Use a stiff brush to scrub away the remaining paint.
- Vinegar Solution: For stubborn residue, soak the tray in a solution of vinegar and water before scrubbing.
Eco-Friendly Cleaning Alternatives
Natural Solvents
- White Vinegar: Effective for cleaning brushes and tools used with water-based paints. Soak tools in vinegar to loosen paint before scrubbing.
- Citrus-Based Cleaners: Use citrus-based solvents for oil-based paints. These are less harsh and more environmentally friendly than traditional solvents.
- Baking Soda Paste: Mix baking soda with water to create a paste for scrubbing paint off tools and surfaces.
Minimizing Water Usage
- Reuse Cleaning Solutions: Reuse your cleaning solvents and water for multiple cleanings. Allow paint to settle at the bottom, then pour the clear liquid off the top for reuse.
- Two-Bucket System: Use one bucket for rinsing off the majority of paint and another for a final rinse. This reduces the amount of water needed.
- Brush Spinners: Use a brush spinner to remove excess paint and water, reducing the need for multiple rinses.
Safe Disposal of Paint Waste
- Collect and Dispose Properly: Collect paint waste in a container and take it to a hazardous waste disposal facility. Do not pour paint waste down the drain.
- Dry Out Residue: Let paint residue dry out in a tray or on newspaper before disposing of it in the trash.
- Use Eco-Friendly Products: Opt for eco-friendly paint and cleaning products that are easier to dispose of and less harmful to the environment.
By addressing common cleaning issues and adopting eco-friendly practices, you can maintain your painting tools effectively while minimizing your environmental impact. Proper tool care and responsible disposal of paint waste contribute to a healthier environment and more sustainable painting practices.
Long-Term Tool Maintenance
Regular Inspection
Identifying Wear and Tear
- Visual Inspection: Regularly examine your painting tools for visible signs of wear, such as frayed bristles on brushes, cracks in handles, or rust on metal parts.
- Performance Check: Pay attention to how the tools perform. If brushes are losing their shape or rollers are not applying paint evenly, it may be time to inspect them more closely.
- Frequent Usage Areas: Focus on areas that experience the most wear, such as the base of brush bristles and the edges of paint trays.
Repairing Damaged Tools
- Brush Restoration: For brushes with splayed bristles, use a brush comb to realign them. Soak in hot water or a brush conditioner to restore shape.
- Roller Repairs: Replace roller covers that have become too worn or damaged. Clean and check the roller frame for any bends or breakage.
- Handle Fixes: Secure loose handles on brushes and rollers with adhesive or by tightening screws. Replace handles if they are cracked or splintered.
Replacing Worn-Out Parts
- Brushes: When bristles become too worn or stiff, it’s time to replace the brush. Look for high-quality replacements that match the type and size you need.
- Rollers: Replace roller covers when they no longer provide an even coat of paint or if they begin to shed fibers.
- Accessories: Regularly check and replace other accessories like paint trays, buckets, and scrapers as needed to ensure optimal performance.
Professional Tips and Tricks
Advice from Experienced Painters
- Tool Rotation: Rotate the use of multiple tools to ensure even wear and extend the lifespan of each tool.
- Brush Bristle Care: Always store brushes with bristles facing down or horizontally to prevent them from deforming.
- Regular Cleaning: Clean tools immediately after use to prevent paint from hardening and becoming difficult to remove.
Cost-Saving Measures
- Buy in Bulk: Purchase frequently used items like roller covers and brush heads in bulk to save money.
- Quality over Quantity: Invest in high-quality tools that may cost more upfront but last longer and perform better over time.
- DIY Repairs: Learn basic repair techniques to fix minor damages yourself instead of constantly buying new tools.
Time-Saving Techniques
- Efficient Cleaning: Use tools like brush spinners and roller cleaners to speed up the cleaning process.
- Quick Storage: Create a dedicated storage area for your tools that allows for easy access and organization, saving time when starting and finishing projects.
- Preparation: Prepare all necessary tools and materials before starting a project to avoid interruptions and delays.
By incorporating these long-term maintenance practices and professional tips, you can extend the life of your painting tools, save money, and improve the efficiency and quality of your painting projects. Proper care and smart techniques ensure that your tools remain in excellent condition and ready for use whenever needed.
Conclusion
Recap of Key Points
Maintaining your painting tools through proper cleaning and storage is essential for achieving high-quality results in your painting projects. Key points to remember include:
- Importance of Proper Cleaning: Regular and thorough cleaning extends the life of your tools and ensures better performance.
- Preparation: Having the right supplies and setting up a dedicated cleaning station makes the process more efficient.
- Tool-Specific Techniques: Different tools like synthetic brushes, natural bristle brushes, rollers, and paint trays require specific cleaning methods.
- Long-Term Maintenance: Regular inspection, repair, and replacement of worn-out parts keep your tools in top condition.
- Professional Tips: Following advice from experienced painters can save time and money while improving the quality of your work.
Encouragement to Maintain Tools for Better Painting Results
Consistently maintaining your painting tools is an investment in your craft. Clean and well-maintained tools not only make your work easier but also result in smoother finishes and more professional outcomes. By incorporating these best practices into your routine, you ensure that your tools will be ready to deliver excellent results for every project.
FAQs
How often should I clean my painting tools?
You should clean your painting tools immediately after each use. This prevents paint from drying and hardening on the tools, making them easier to clean and maintaining their performance for future projects.
What’s the best way to remove dried paint from brushes?
Soak brushes with dried paint in a suitable solvent, such as mineral spirits for oil-based paints or white vinegar for water-based paints. After soaking, use a brush comb or wire brush to remove the softened paint.
Can I use household cleaners for cleaning painting tools?
Yes, mild dish soap and warm water can be effective for cleaning most painting tools. However, for oil-based paints, you will need to use a solvent like mineral spirits. Avoid harsh chemicals that can damage the tools.
How do I prevent paint from drying on tools during a project?
Wrap brushes and rollers in plastic wrap or aluminum foil between coats to keep them moist. Alternatively, place them in a sealed plastic bag and store in the refrigerator for short periods.
What are some eco-friendly cleaning products for painting tools?
Eco-friendly options include white vinegar for soaking brushes, citrus-based cleaners for oil-based paints, and biodegradable soaps. Reusable rags and a two-bucket system for rinsing can also help minimize environmental impact.