Painting can completely transform a space, but achieving a flawless finish starts long before you open that first can of paint. Properly cleaning and preparing the surfaces you plan to paint is a crucial step that many overlook, leading to unsatisfactory results. This guide will walk you through the essential cleaning checklist before painting, ensuring that your paint job is smooth, long-lasting, and professional-looking.
Why Cleaning Before Painting is Crucial
Before you even think about dipping your brush or roller into paint, it’s vital to understand why cleaning the surfaces is a non-negotiable step in the painting process. A clean surface is the foundation of a successful paint job, directly impacting how well the paint adheres and how long it lasts.
The Importance of a Clean Surface
Ensuring Paint Adheres Properly
Paint needs a clean, smooth surface to adhere to effectively. Dust, dirt, grease, and other contaminants can create a barrier between the paint and the surface, leading to poor adhesion. If the paint doesn’t stick properly, it can result in uneven coverage, streaks, or even peeling over time. By thoroughly cleaning the surface, you ensure that the paint bonds directly to the material, providing a more even and durable finish.
Preventing Imperfections and Peeling
Even small particles of dust or dirt can cause imperfections in the paint, such as bumps or rough patches. Over time, these imperfections can lead to peeling or flaking paint, especially in high-traffic areas or rooms with high humidity, like bathrooms and kitchens. Cleaning the surface removes these particles, reducing the risk of imperfections and helping the paint to form a solid, uniform layer that resists peeling.
Common Mistakes to Avoid
Skipping Cleaning Steps
One of the most common mistakes people make when painting is skipping the cleaning process entirely or only giving it a cursory effort. It might seem like a time-saver, but neglecting this step often leads to more work later, such as having to repaint sooner than expected due to poor adhesion or visible dirt trapped under the paint. Always take the time to thoroughly clean all surfaces, even if they appear clean at first glance.
Using the Wrong Cleaning Products
Another frequent mistake is using the wrong cleaning products, which can damage the surface or leave behind residues that interfere with paint adhesion. For example, some household cleaners contain oils or silicones that can leave a film on the surface, preventing the paint from adhering properly. It’s essential to choose cleaning products specifically designed for the material you’re painting and to follow up with a rinse of clean water to remove any residues.
By understanding the importance of cleaning and avoiding these common mistakes, you’ll set the stage for a successful painting project that looks great and stands the test of time.
Essential Tools and Materials for Cleaning
Before you begin the cleaning process, it’s important to gather all the necessary tools and materials. Having the right supplies on hand will not only make the job easier but also ensure that you achieve the best possible results. This section will outline the must-have cleaning supplies and protective gear you’ll need to prepare your surfaces for painting.
Must-Have Cleaning Supplies
To effectively clean the surfaces before painting, you’ll need a range of cleaning supplies that are both versatile and suited to the specific surfaces you’re working on. Here’s a breakdown of the essential items:
- Cleaning Solutions: Choose a mild detergent or a specialized wall cleaner that’s safe for the surfaces you’ll be painting. For tougher grime or greasy spots, consider a degreaser or a solution with trisodium phosphate (TSP), which is highly effective in removing stubborn dirt and stains.
- Rags and Sponges: Microfiber rags and sponges are perfect for wiping down surfaces. Microfiber is particularly good at trapping dust and dirt, ensuring a thorough clean without leaving behind lint or residue.
- Brushes: A variety of brushes, including soft-bristled and stiff-bristled options, can help you reach into corners, clean baseboards, and tackle textured surfaces like brick or stucco. Use a small, stiff-bristled brush for scrubbing away tougher spots.
Having these supplies on hand will allow you to tackle any cleaning task effectively, ensuring that your surfaces are spotless and ready for painting.
Protective Gear and Equipment
When cleaning before painting, it’s also important to protect yourself from potential hazards, such as harsh chemicals or dust. Wearing the right protective gear will keep you safe and comfortable throughout the process.
- Gloves: Disposable or reusable gloves are essential for protecting your hands from cleaning solutions, especially if you’re using strong chemicals like TSP. They also help prevent skin irritation from prolonged exposure to water.
- Masks: A dust mask or respirator is important, particularly if you’re working in a dusty environment or using strong cleaning agents. This will protect your lungs from inhaling harmful particles or fumes.
- Safety Goggles: To shield your eyes from splashes of cleaning solutions, especially when working on overhead surfaces or in tight spaces, safety goggles are a must. They provide a secure fit and prevent any accidental contact with your eyes.
By equipping yourself with these essential cleaning supplies and protective gear, you’ll be well-prepared to clean your surfaces thoroughly and safely, setting the stage for a successful painting project.
Step-by-Step Cleaning Checklist
To ensure that your painting project is a success, it’s essential to follow a systematic cleaning process. This step-by-step checklist will guide you through preparing your surfaces, so they are clean, smooth, and ready for paint. Each step is crucial to achieving a professional-looking finish.
1. Declutter the Area
Before you start cleaning, it’s important to declutter the room. Remove all furniture, decorations, and other items from the space to give yourself plenty of room to work. This will also prevent dust and debris from settling on your items during the cleaning process.
- Removing Furniture and Items from the Room: Begin by moving all furniture and decorations out of the room or covering them with protective sheets if they can’t be moved. This makes it easier to clean the entire surface area without obstruction and ensures nothing gets accidentally damaged or dirtied.
2. Dust and Vacuum All Surfaces
Once the room is clear, the next step is to remove dust and dirt from all surfaces. Dust can prevent paint from adhering properly, so it’s important to be thorough.
- Cleaning Ceilings, Walls, and Floors: Start by dusting the ceiling and upper walls, as dust will naturally fall downwards. Use a microfiber cloth or duster for this step. Then, move on to the walls and finally the floors. A vacuum cleaner with a brush attachment is ideal for removing dust from walls and baseboards.
- Best Practices for Using a Vacuum Cleaner on Walls: When vacuuming walls, use a soft brush attachment to avoid scratching or damaging the surface. Work in small sections, moving from top to bottom to ensure all dust is removed. For textured walls, consider using a vacuum with a stronger suction setting to effectively remove dust from crevices.
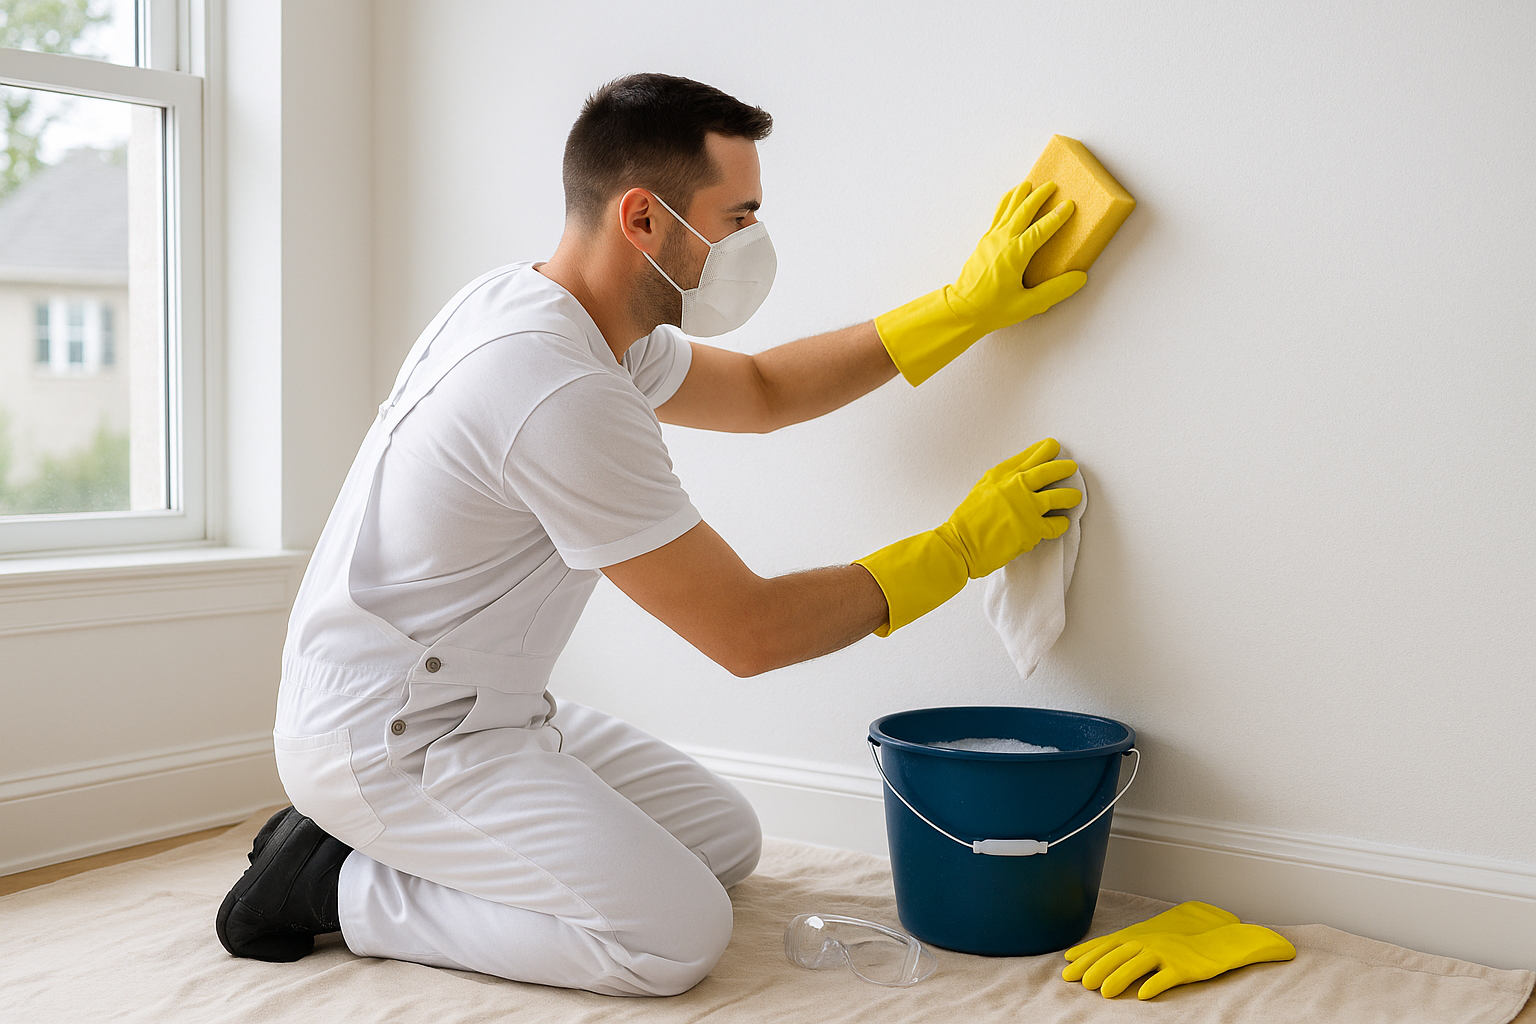
3. Wash the Walls and Surfaces
After dusting, it’s time to wash the walls and other surfaces. This step removes any grease, grime, or residue that could interfere with the paint’s adhesion.
- Choosing the Right Cleaning Solution: Select a cleaning solution that’s appropriate for the surface you’re working on. For general cleaning, a mild detergent mixed with water works well. For tougher grime or kitchen walls, consider using a degreaser or a TSP (trisodium phosphate) solution.
- How to Properly Wash Walls, Trim, and Baseboards: Dampen a sponge or cloth with your cleaning solution and wipe down the walls, starting from the top and working your way down. Pay special attention to areas around light switches, door frames, and trim, as these spots often accumulate more dirt and grease. For baseboards, use a small brush to scrub away any built-up dirt.
4. Address Stains and Mold
Stains and mold can be stubborn and require special attention to ensure they don’t affect your paint job.
- Removing Stubborn Stains and Mold Spots: For stains, apply a stain remover or a baking soda paste and gently scrub with a soft brush. Mold spots should be treated with a solution of bleach and water (one part bleach to three parts water) to kill the mold and remove discoloration. Be sure to wear protective gear when dealing with mold.
- How to Prevent Mold Recurrence: After cleaning, make sure the area is well-ventilated to help prevent mold from coming back. Consider using a mold-resistant primer before painting in areas prone to moisture, such as bathrooms and kitchens.
5. Rinse and Dry the Surfaces
The final step before painting is to rinse off any cleaning solutions and ensure the surfaces are completely dry.
- Rinsing Off Cleaning Solutions: After washing, it’s important to rinse the surfaces with clean water to remove any residue from the cleaning solutions. Use a clean, damp sponge or cloth to wipe down the walls and trim, making sure no soap or cleaning product is left behind.
- Ensuring Surfaces Are Completely Dry Before Painting: Allow sufficient time for the surfaces to dry completely before you begin painting. You can use fans or a dehumidifier to speed up the drying process, especially in areas with high humidity. Double-check that there are no damp spots, as painting over wet surfaces can cause the paint to bubble or peel.
By following this step-by-step cleaning checklist, you’ll create a clean and smooth surface that is ready for a fresh coat of paint, ensuring a beautiful and durable finish.
Special Considerations for Different Surfaces
Different surfaces require different approaches when it comes to cleaning and preparation before painting. Understanding these nuances will help you choose the right methods and products, ensuring that your paint adheres properly and lasts longer. In this section, we’ll cover the specific considerations for drywall, plaster, wood, metal, and concrete surfaces.
Cleaning Drywall vs. Plaster
Drywall and plaster are two common types of wall surfaces, but they require different cleaning techniques due to their distinct properties. Here’s how they differ:
- Differences in Cleaning Methods and Products:
- Drywall: Drywall is more porous and can be easily damaged if too much water or harsh cleaning products are used. It’s best to use a mild detergent mixed with water and a soft sponge to clean drywall. Avoid soaking the surface, and always rinse with a damp cloth to remove any soap residue.
- Plaster: Plaster, on the other hand, is more durable and can handle a more robust cleaning process. A stronger cleaning solution, like TSP (trisodium phosphate), can be used to remove stubborn stains and grime. However, it’s still important to avoid oversaturating the surface, as excess moisture can lead to damage.
Prepping Wood Surfaces
Wood surfaces add warmth and character to a space, but they also require careful preparation before painting. Proper cleaning and prep work are essential to ensure the paint adheres well and lasts for years.
- How to Clean and Prep Wood for Painting:
- Cleaning: Start by dusting the wood surface with a dry cloth to remove loose dirt and dust. Then, use a wood cleaner or a mild detergent mixed with water to wash the surface. Be sure to scrub along the grain of the wood to avoid damaging the surface. After cleaning, rinse with clean water and dry thoroughly.
- Prepping: Once the wood is clean, inspect it for any imperfections, such as dents, cracks, or holes. These should be filled with wood filler and sanded smooth before painting. Additionally, lightly sand the entire surface with fine-grit sandpaper to create a smooth, even surface for the paint to adhere to. Wipe away any dust from sanding with a damp cloth before applying primer.
Metal and Concrete Surfaces
Metal and concrete are durable materials, but they require specific cleaning techniques to ensure paint adheres properly. These surfaces are often found in basements, garages, and outdoor areas, where they may be exposed to harsh conditions.
- Specific Cleaning Needs for Metal and Concrete:
- Metal: Metal surfaces should be cleaned with a degreaser to remove any oil, grease, or rust. For heavily rusted areas, use a wire brush or sandpaper to remove the rust before cleaning. After cleaning, rinse the metal thoroughly with water and allow it to dry completely. Apply a rust-inhibiting primer before painting to prevent future rusting.
- Concrete: Concrete surfaces are porous and can trap dirt and stains. Start by sweeping the surface to remove loose debris. Then, use a concrete cleaner or a mixture of water and trisodium phosphate (TSP) to scrub the surface. For stubborn stains, such as oil or grease, apply a stain remover and scrub with a stiff-bristled brush. Rinse the concrete thoroughly with water and let it dry completely before painting.
By understanding and applying these special considerations for different surfaces, you’ll ensure that your paint adheres well and that your final result is both beautiful and durable.
Troubleshooting Common Cleaning Issues
Even with careful cleaning, you might encounter some stubborn problems that can interfere with your painting project. Addressing these issues promptly and effectively is crucial to ensuring a smooth, professional finish. This section will guide you through troubleshooting common cleaning challenges, including persistent dirt and sticky surfaces.
Dealing with Persistent Dirt and Grime
Sometimes, despite your best efforts, certain areas may still have stubborn dirt or grime that’s difficult to remove. These tough spots can prevent paint from adhering properly, leading to unsightly results.
- Tips for Handling Tough Spots:
- Targeted Cleaning: Focus on the areas with persistent dirt or grime by using a stronger cleaning solution, such as a degreaser or a mixture of vinegar and water. Apply the solution directly to the affected area and let it sit for a few minutes to break down the grime.
- Scrubbing Tools: Use a soft-bristled brush or a non-abrasive scrub pad to gently scrub the area. For particularly stubborn spots, a small, stiff-bristled brush can help you get into crevices and remove the grime more effectively.
- Multiple Passes: In some cases, you may need to clean the area multiple times to fully remove the dirt. Be patient and allow each cleaning solution to work before rinsing and repeating.
- Heat Application: For sticky or greasy grime, applying a little heat with a hairdryer can help loosen the material, making it easier to wipe away.
By applying these strategies, you can effectively tackle tough spots and ensure that the surface is clean and ready for painting.
What to Do If Surfaces Are Still Sticky After Cleaning
After cleaning, you might notice that some surfaces feel sticky or tacky to the touch. This can be a sign that the cleaning product hasn’t been fully rinsed off or that a residue has been left behind, which can interfere with paint adhesion.
- Understanding Why Surfaces May Remain Sticky:
- Residual Cleaning Products: If cleaning solutions, especially those containing oils or soaps, are not rinsed thoroughly, they can leave a sticky residue on the surface. This residue can make it difficult for the paint to adhere properly and can lead to a patchy or uneven finish.
- Excess Moisture: In some cases, excess moisture from the cleaning process can combine with the cleaning product and create a sticky film on the surface. This is more common in humid environments or when the surface is not allowed to dry fully.
- Solutions to Fix the Problem:
- Rinse Thoroughly: The first step in resolving sticky surfaces is to rinse them again thoroughly with clean water. Use a damp cloth or sponge and wipe down the entire area, making sure to remove any remaining cleaning product.
- Use a Vinegar Solution: If the sticky residue persists, try wiping the surface with a solution of equal parts white vinegar and water. Vinegar helps break down soap residue and can neutralize the stickiness.
- Dry the Surface Completely: After rinsing, ensure that the surface is completely dry before attempting to paint. You can use fans or a dehumidifier to speed up the drying process, especially in areas with high humidity.
- Light Sanding: If the stickiness persists even after rinsing, lightly sand the area with fine-grit sandpaper to remove any remaining residue. Wipe away the dust with a clean, damp cloth before proceeding with painting.
By troubleshooting and addressing these common cleaning issues, you can ensure that your surfaces are in the best possible condition for painting, resulting in a smooth, long-lasting finish.
Final Inspection Before Painting
Before you start painting, it’s crucial to conduct a final inspection of the surfaces you’ve cleaned. This step ensures that your hard work in preparing the surfaces will pay off with a smooth and durable paint finish. In this section, we’ll cover how to check for residual dust or debris and how to make sure surfaces are completely dry.
Checking for Residual Dust or Debris
Even after thorough cleaning, it’s possible that some dust or debris may still be present. Ensuring that your surfaces are completely clean before painting is essential for a flawless finish.
- How to Spot Missed Areas:
- Visual Inspection: Begin by visually inspecting the surfaces in good lighting. Walk around the room and look at the walls, trim, and other areas from different angles to catch any dust or debris that might be lingering. Pay special attention to corners, baseboards, and edges where dust tends to accumulate.
- Tactile Check: Run your hand lightly over the surfaces to feel for any rough patches or particles that you might have missed. Dust or debris left behind can cause bumps or imperfections in the paint, so this step is crucial.
- Use a Flashlight: A flashlight can be a valuable tool for spotting dust or debris that may not be visible under normal lighting. Shine the flashlight parallel to the surface; any particles or imperfections will cast small shadows, making them easier to see.
- Sticky Tape Test: For an extra level of assurance, press a piece of low-tack painter’s tape onto the surface and peel it off. If the tape picks up dust or debris, you’ll know that area needs additional cleaning.
By taking the time to spot and remove any remaining dust or debris, you’ll ensure that your paint job starts on the right foot.
Ensuring Surfaces Are Completely Dry
One of the most important factors in achieving a successful paint job is making sure that all surfaces are completely dry before you begin. Painting over damp surfaces can lead to peeling, bubbling, and other issues that will compromise the longevity of your paint.
- Tools to Check Moisture Levels:
- Moisture Meter: A moisture meter is a handy tool that can give you a precise reading of the moisture content in your surfaces. Simply press the device against the wall or other surface, and it will display the moisture level. Ideally, the moisture content should be below 12-15% before you start painting.
- Touch Test: While less precise, the touch test can also help determine if a surface is dry. Press your hand lightly against the surface. If it feels cool or damp to the touch, it’s not yet ready for painting. Allow more time for drying or use fans to speed up the process.
- Paper Towel Test: Tape a small piece of paper towel to the surface and leave it for a few hours. If the paper towel is damp when you remove it, there’s still moisture present, and you should wait longer before painting.
- Humidity Monitor: Monitoring the room’s humidity levels with a hygrometer can also help you gauge whether your surfaces are likely to dry quickly. If the humidity is high, it may take longer for surfaces to dry, so consider using a dehumidifier to bring the levels down.
By ensuring that all surfaces are completely dry, you’ll avoid common painting pitfalls and achieve a smooth, professional finish that lasts.
Frequently Asked Questions
- How long should I wait after cleaning before I start painting?
- It’s crucial to ensure that surfaces are completely dry before you begin painting. The drying time can vary depending on the type of cleaning solution used, the room’s humidity, and the material of the surface. As a general rule, you should wait at least 24 hours after cleaning to start painting. If the room is humid or the surface feels even slightly damp to the touch, consider waiting a bit longer or using fans or a dehumidifier to speed up the drying process.
- Can I paint over lightly stained walls without cleaning?
- It’s not recommended to paint over any stains without cleaning first. Even light stains can affect how the paint adheres to the surface, leading to uneven coverage or the stain bleeding through the new paint. Always clean the walls thoroughly to remove any stains, grease, or dirt. If the stains are stubborn, consider using a stain-blocking primer after cleaning and before applying your topcoat of paint.
- What is the best way to clean greasy kitchen walls before painting?
- Greasy kitchen walls can be challenging to clean, but it’s essential to remove all grease to ensure good paint adhesion. The best approach is to use a degreaser or a solution of warm water and dish soap. Apply the solution with a sponge or cloth, scrubbing in circular motions to lift the grease from the surface. For particularly stubborn grease, you can use trisodium phosphate (TSP), which is highly effective at cutting through grease. Be sure to rinse the walls thoroughly with clean water after using any cleaning solution and allow them to dry completely before painting.
- Should I sand the walls after cleaning and before painting?
- Yes, sanding the walls after cleaning can help create a smooth surface that’s ready for painting. Sanding helps remove any remaining imperfections, such as rough patches, old paint, or slight bumps, that could affect the final paint finish. Use fine-grit sandpaper (around 220-grit) to lightly sand the walls after they’ve dried from cleaning. After sanding, wipe down the walls with a damp cloth to remove any dust before applying primer or paint.
- Can I use homemade cleaning solutions for pre-painting prep?
- Homemade cleaning solutions can be effective for pre-painting prep, especially for mild cleaning tasks. A common and effective homemade solution is a mixture of water, white vinegar, and a few drops of dish soap. This solution works well for general cleaning and removing light dirt or grime. However, for tougher jobs, like removing grease or heavy stains, you may need to use a stronger commercial cleaner, such as a degreaser or TSP. Always rinse surfaces thoroughly after using any cleaning solution, homemade or commercial, to ensure no residue is left behind that could interfere with paint adhesion.