The Importance of Wall Preparation
Why Wall Preparation is Crucial for a Quality Paint Job
Proper wall preparation is the foundation of any successful painting project. When you take the time to prepare your walls correctly, you ensure that the paint adheres more effectively, creating a smooth, even finish that lasts longer. Paint applied to a well-prepared surface is less likely to peel, crack, or develop unsightly bubbles over time. In addition, preparation helps to highlight the true color and texture of the paint, allowing for a more vibrant and professional-looking result.
Wall preparation also involves addressing any imperfections, such as cracks, holes, or uneven surfaces, that could affect the final appearance of your paint job. By fixing these issues before painting, you create a flawless canvas that not only looks better but also helps to protect your walls from further damage. In essence, proper preparation is a crucial step that ensures your investment in time, effort, and materials yields the best possible outcome.
Common Mistakes When Skipping Wall Preparation
Skipping or rushing through wall preparation is a common mistake that can lead to various painting problems. One of the most significant issues is poor paint adhesion, where the paint fails to stick to the wall properly, resulting in peeling or chipping. This can occur if the wall is not thoroughly cleaned, leaving behind dust, grease, or other contaminants that prevent the paint from bonding with the surface.
Another common mistake is neglecting to repair wall imperfections before painting. Even small cracks, holes, or dents can become more noticeable once painted, detracting from the overall appearance of the room. Additionally, failing to sand the walls can leave them rough or uneven, which can cause the paint to appear blotchy or streaky.
Finally, skipping the priming step can result in uneven coverage and color inconsistency, especially if the walls are stained or have been previously painted in a dark color. Primer acts as a base layer that helps the paint adhere better and provides a uniform surface for the topcoat. Neglecting this step can lead to a less durable and visually appealing finish.
Proper wall preparation is not just an extra step; it’s a critical part of achieving a high-quality, long-lasting paint job. Avoiding these common mistakes will save you time, money, and frustration in the long run, ensuring that your finished project meets your expectations.
Tools and Materials Needed for Wall Preparation
Essential Tools for Wall Preparation
To achieve a smooth and professional finish on your walls, having the right tools is essential. Here’s a list of the most important tools you’ll need for effective wall preparation:
- Spackling Knife: This tool is crucial for applying spackling compound to fill in cracks, holes, and dents in the wall. It allows you to spread the compound evenly and smoothly over imperfections.
- Sandpaper: Sandpaper is used to smooth out rough patches and level the surface after applying spackle or putty. It’s available in various grits, with coarse grits for rough sanding and fine grits for finishing touches.
- Putty: Putty is used to fill in minor cracks, nail holes, and other small imperfections. It’s easy to apply and dries quickly, making it a versatile tool in wall preparation.
- Primer: A primer is essential for creating a smooth, even base that helps the paint adhere better. It seals the surface, blocks stains, and provides a uniform color for the topcoat.
- Drop Cloths: Protect your floors and furniture from dust and debris during wall preparation by using drop cloths. They also help keep paint splatters off your surfaces.
- Dust Mask and Safety Glasses: Safety should always be a priority. Wear a dust mask to protect your lungs from dust and debris, and safety glasses to shield your eyes during sanding and other tasks.
- Vacuum Cleaner or Tack Cloth: After sanding, it’s important to remove dust from the walls. A vacuum cleaner with a brush attachment or a tack cloth can help ensure the surface is clean and ready for priming.
- Painter’s Tape: Use painter’s tape to protect trim, ceilings, and other areas you don’t want to paint. It helps you achieve clean, sharp lines during the painting process.
Choosing the Right Materials
Selecting the correct materials is just as important as having the right tools. The primer and filler you choose should be appropriate for the type of wall you’re working on and the specific issues you’re addressing. Here’s a breakdown of the key materials to consider:
- Primer:
- Latex Primer: Ideal for new drywall and previously painted surfaces. It dries quickly and is easy to clean up.
- Oil-Based Primer: Best for stained or damaged walls, as it provides excellent stain-blocking properties and adheres well to challenging surfaces.
- Shellac Primer: A great choice for covering severe stains like water damage or smoke. It also works well on wood and metal surfaces.
- Filler/Putty:
- Lightweight Spackle: Perfect for filling small holes and cracks. It dries quickly and is easy to sand.
- Joint Compound: Used for larger repairs, such as patching holes and smoothing out uneven areas on drywall.
- Caulk: Essential for filling gaps between walls and trim, as well as sealing joints to prevent moisture penetration.
Choosing the right materials ensures that your walls are properly prepared and ready to receive paint, resulting in a more durable and visually appealing finish.
Step-by-Step Guide to Preparing Walls for Painting
Step 1: Remove Old Paint and Wallpaper
Before you begin any new painting project, it’s essential to remove any existing paint or wallpaper that could interfere with the adhesion of the new paint. Here are some techniques for safely removing old paint and wallpaper:
- For Old Paint:
- Start by inspecting the paint surface for any areas that are peeling or flaking. Use a paint scraper or a putty knife to gently lift and remove the loose paint.
- If the old paint is stubborn, consider using a chemical paint stripper. Apply it according to the manufacturer’s instructions, and use a scraper to remove the softened paint.
- For larger areas, you may want to use an electric heat gun to soften the paint before scraping it off. Always work in well-ventilated areas and wear protective gear to avoid inhaling fumes.
- For Wallpaper:
- Start by scoring the wallpaper with a wallpaper scoring tool. This creates small holes that allow water or a wallpaper removal solution to penetrate and loosen the adhesive.
- Apply a wallpaper removal solution or a mixture of warm water and vinegar to the wallpaper using a sponge or spray bottle. Allow it to soak for several minutes.
- Use a wallpaper scraper to peel off the wallpaper. Work slowly and carefully to avoid damaging the wall underneath. For particularly stubborn areas, reapply the removal solution and try again.
Step 2: Clean the Walls Thoroughly
Cleaning the walls is a crucial step in ensuring that the new paint adheres properly. Here are the best practices for cleaning walls:
- Materials Needed:
- A mild detergent or a mixture of water and vinegar
- A sponge or soft cloth
- A bucket of warm water
- Cleaning Process:
- Begin by removing any dust or cobwebs from the wall surface using a duster or a vacuum cleaner with a brush attachment.
- Mix a mild detergent with warm water or use a vinegar-water solution. Dip the sponge into the solution, wring it out, and gently scrub the walls in a circular motion.
- Pay special attention to areas that are more likely to have grease or grime, such as the kitchen or areas around light switches.
- Rinse the walls with clean water using a fresh sponge to remove any soap residue. Allow the walls to dry completely before moving on to the next step.
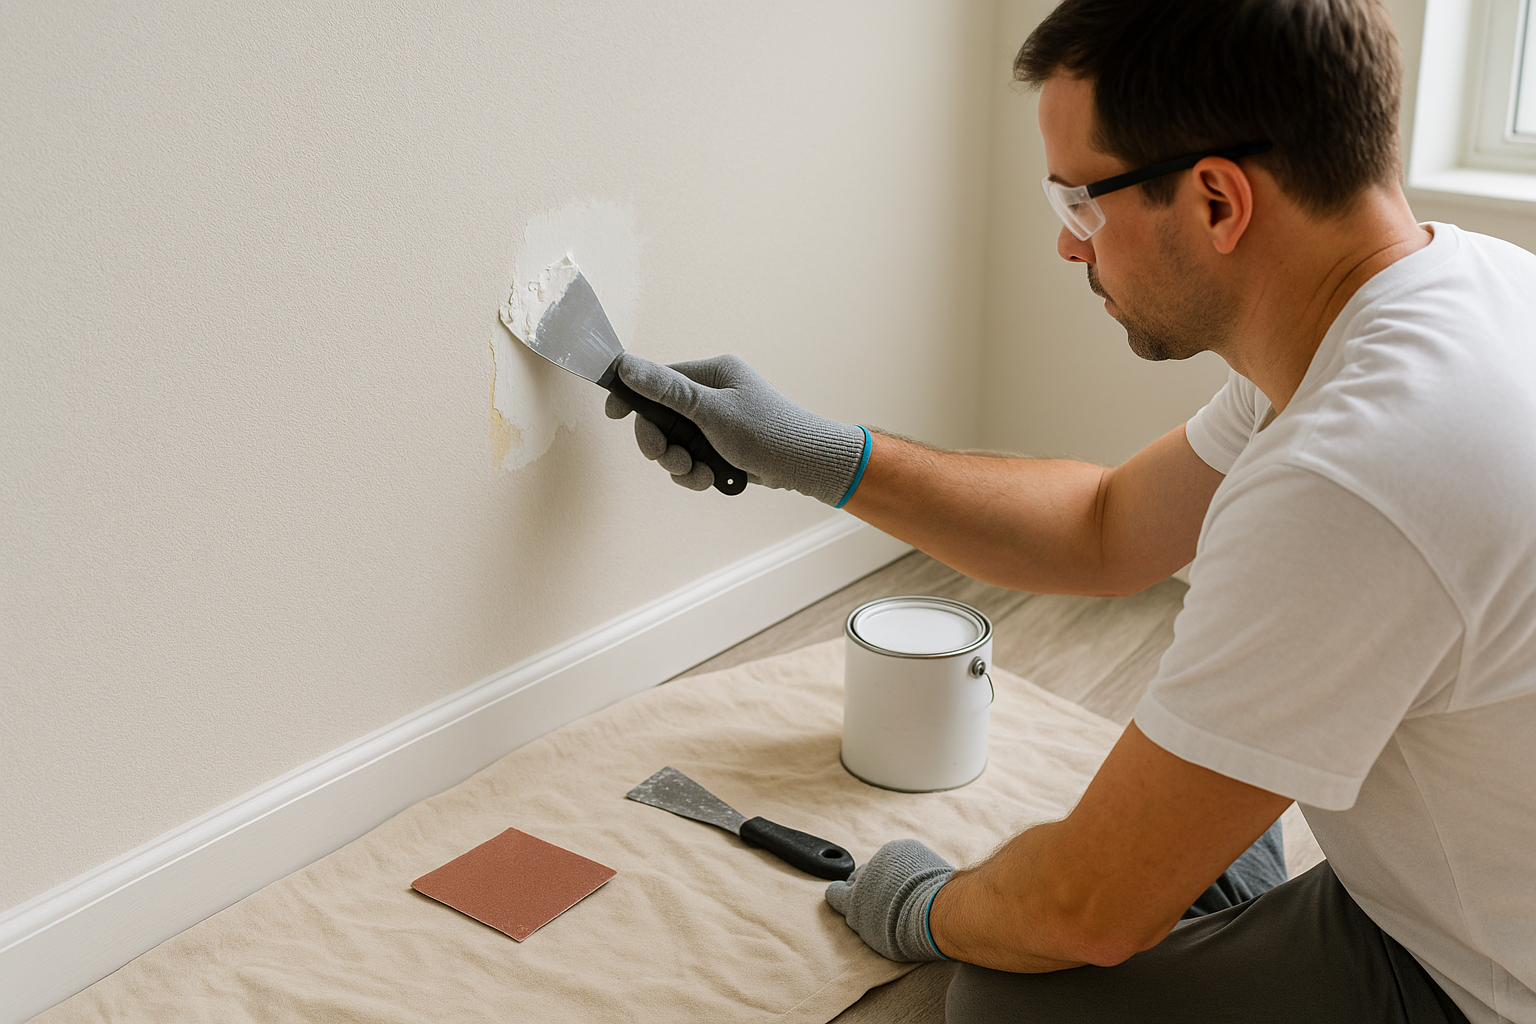
Step 3: Repair Wall Imperfections
Before painting, it’s essential to address any cracks, holes, or dents in the walls to ensure a smooth and flawless finish. Here’s how to effectively repair wall imperfections:
- Filling Cracks and Holes:
- Use a putty knife to apply spackling compound or joint compound to small cracks and holes. Press the compound into the imperfection and smooth it out with the knife.
- For larger holes, you may need to use a patch kit. Apply the patch over the hole, then cover it with joint compound. Smooth it out and feather the edges so that it blends with the wall surface.
- Allow the compound to dry according to the manufacturer’s instructions, and apply additional layers if necessary.
- Smoothing Out Dents:
- For small dents, apply a thin layer of spackling compound using a putty knife. Smooth it out and let it dry.
- Once dry, sand the area lightly with fine-grit sandpaper to ensure it is level with the surrounding wall.
Step 4: Sand the Walls Smooth
Sanding the walls is a critical step in achieving a smooth surface that’s ready for painting. Follow these tips for effective sanding:
- Choosing the Right Sandpaper:
- Use medium-grit sandpaper (around 120-150 grit) for sanding down rough spots and smoothing out patched areas.
- For a final finish, switch to fine-grit sandpaper (around 220 grit) to ensure the surface is smooth and ready for priming.
- Sanding Technique:
- Start by lightly sanding the entire wall surface using a sanding pole or sanding block. Work in a circular motion to ensure even sanding.
- Focus on areas where you’ve applied spackling or joint compound, making sure they blend seamlessly with the rest of the wall.
- After sanding, use a tack cloth or vacuum cleaner with a brush attachment to remove any dust from the walls.
Step 5: Apply a Primer
Priming the walls is an essential step that prepares the surface for the final coat of paint. Here’s how to do it correctly:
- When and Why to Use Primer:
- Always use primer on new drywall, bare wood, or surfaces that have been heavily repaired. Primer creates a smooth, uniform surface that enhances paint adhesion.
- If you’re painting over a dark or stained wall, a primer will help cover the old color and prevent stains from bleeding through the new paint.
- Application Tips:
- Use a roller to apply primer to large wall surfaces, starting from the top and working your way down. For edges and corners, use a brush.
- Apply the primer in thin, even coats, and allow it to dry completely before applying additional coats or the final paint color.
- For best results, consult the primer manufacturer’s instructions regarding drying times and recommended number of coats.
Following these steps ensures that your walls are thoroughly prepared, providing a solid foundation for a beautiful, long-lasting paint job.
Special Considerations for Different Wall Types
Preparing Drywall vs. Plaster Walls
When preparing walls for painting, it’s important to recognize that drywall and plaster walls require different techniques due to their unique properties:
- Drywall:
- Surface Characteristics: Drywall is smoother and more uniform, but it’s also more susceptible to dents, scratches, and other surface damage.
- Preparation Techniques:
- Filling and Sanding: Drywall is relatively easy to repair. Use lightweight spackle or joint compound to fill in any holes or cracks. Once dry, sand the surface lightly with fine-grit sandpaper to ensure smoothness.
- Priming: Drywall is porous, so applying a quality primer is essential to seal the surface and create a uniform base for the paint. A latex primer is often recommended for drywall.
- Plaster:
- Surface Characteristics: Plaster walls are denser and more durable, but they can develop hairline cracks and require more effort to repair. They also tend to have a more textured surface.
- Preparation Techniques:
- Repairing Cracks: Hairline cracks in plaster walls can be filled with a setting-type joint compound or a special plaster patching product. For larger cracks, consider using a plaster repair kit that includes reinforcing tape.
- Sanding and Smoothing: Plaster walls may need more extensive sanding, especially if they have been previously painted or textured. Start with medium-grit sandpaper and finish with fine-grit for a smooth surface.
- Priming: Use a high-quality bonding primer specifically designed for plaster walls. This helps to ensure good adhesion and provides a solid base for the topcoat.
Understanding these differences ensures that you apply the correct preparation methods, leading to better paint adhesion and a more professional finish on both drywall and plaster walls.
Dealing with Mold and Mildew
Mold and mildew are common problems in areas with high humidity, such as bathrooms and basements. Addressing these issues before painting is crucial to prevent them from reappearing and damaging your walls:
- Identifying Mold and Mildew:
- Mold often appears as black, green, or brown spots on the walls, and it may have a musty odor.
- Mildew, a type of mold, typically shows up as a thin, white or gray powdery film on the surface.
- Treatment Techniques:
- Step 1: Safety First: Always wear protective gear, such as gloves, a mask, and safety goggles, when dealing with mold or mildew. Ensure the area is well-ventilated.
- Step 2: Cleaning: Mix a solution of one part bleach to three parts water. Use a sponge or cloth to scrub the affected areas thoroughly. Alternatively, you can use a commercial mold and mildew remover.
- Step 3: Rinsing and Drying: After cleaning, rinse the walls with clean water and allow them to dry completely. It’s important to eliminate all moisture to prevent mold from returning.
- Step 4: Applying a Mold-Resistant Primer: Once the walls are dry, apply a mold-resistant primer before painting. This type of primer contains fungicides that help prevent mold growth and protect the paint job.
By properly addressing mold and mildew before painting, you ensure a healthy and long-lasting finish that resists future growth. Taking these steps is essential, especially in areas prone to dampness or humidity.
Safety Precautions During Wall Preparation
Protecting Yourself with Proper Gear
When preparing walls for painting, it’s important to prioritize your safety by using the appropriate protective gear. This ensures that you are shielded from potential hazards such as dust, fumes, and sharp tools. Here’s what you’ll need:
- Dust Mask or Respirator: Wearing a dust mask or respirator is essential when sanding walls or working with chemicals, such as paint strippers and primers. These masks filter out fine dust particles and harmful fumes, protecting your lungs from inhalation of potentially dangerous substances.
- Safety Glasses or Goggles: Protect your eyes from dust, debris, and chemical splashes by wearing safety glasses or goggles. This is especially important when sanding, scraping, or applying chemical treatments to the walls.
- Gloves: Use heavy-duty work gloves when handling tools, and chemical-resistant gloves when working with harsh substances like paint strippers, cleaners, or primers. Gloves protect your hands from cuts, abrasions, and chemical burns.
- Protective Clothing: Wear long sleeves and long pants to protect your skin from dust, paint splatters, and chemical exposure. Consider wearing a disposable coverall if you’re working in a particularly dirty or hazardous environment.
- Hearing Protection: If you’re using power tools, such as sanders or electric scrapers, wear earplugs or earmuffs to protect your hearing from prolonged exposure to loud noises.
By equipping yourself with the proper safety gear, you reduce the risk of injury or exposure to harmful substances, making your wall preparation process safer and more efficient.
Ventilation and Dust Control
Proper ventilation and dust control are critical components of a safe and effective wall preparation process. These precautions help to maintain a clean work environment and protect your health:
- Importance of Ventilation:
- Reduce Fume Inhalation: Many of the products used in wall preparation, such as paint strippers, primers, and cleaners, emit fumes that can be harmful if inhaled in large quantities. Ensure your workspace is well-ventilated by opening windows and doors, and consider using fans to circulate fresh air.
- Prevent Overheating: Ventilation also helps to regulate the temperature in your workspace, preventing overheating that could cause discomfort or even heat-related illnesses.
- Minimizing Dust:
- Containment: When sanding or scraping walls, a significant amount of dust can be generated. To minimize its spread, use plastic sheeting or dust barriers to seal off the work area from the rest of your home. This helps to keep dust confined to one area, making it easier to clean up.
- Dust Extraction: If possible, use a vacuum attachment on your sander to collect dust as you work. This reduces airborne particles and makes the sanding process cleaner and more efficient.
- Cleaning Up: After completing your work, thoroughly clean the area using a vacuum with a HEPA filter to remove any residual dust. Wipe down surfaces with a damp cloth to capture any remaining particles.
Taking these steps not only protects your health but also ensures a cleaner and more efficient work environment, making the wall preparation process smoother and safer.
By following these safety precautions, you can ensure a safer and more comfortable working experience while preparing your walls for painting.
Final Checks Before Painting
Inspecting the Walls
Before you begin painting, it’s essential to inspect the walls thoroughly to ensure they are properly prepared and ready to receive paint. This step helps you catch any imperfections or missed spots that could affect the quality of your paint job. Here’s how to conduct a final inspection:
- Use a Flashlight: Shine a bright flashlight parallel to the wall surface. This will help you identify any imperfections, such as small cracks, bumps, or areas where the spackling wasn’t sanded smoothly. The light will cast shadows on uneven surfaces, making it easier to spot issues that need attention.
- Check for Cleanliness: Ensure that the walls are free of dust, dirt, and grease. Even a small amount of residue can prevent the paint from adhering properly. Wipe the walls with a tack cloth or a damp rag to remove any remaining particles.
- Examine Repairs: Inspect areas where you’ve patched holes or cracks. Run your hand over the repaired spots to feel for any roughness or unevenness. If necessary, lightly sand these areas again to achieve a smooth finish.
- Look for Dryness: Make sure all repairs, cleaning, and priming are completely dry. Paint applied over damp surfaces can lead to bubbling, peeling, or uneven coverage.
- Assess Priming Coverage: Verify that the primer has covered the walls uniformly, especially if you’re painting over a dark color or stained surface. Any areas where the primer is thin or missing should be touched up before applying the paint.
Taking the time to carefully inspect the walls will help you avoid common painting problems and ensure a flawless finish.
Prepping the Room for Painting
Before you start painting, it’s crucial to prepare the room to protect floors, furniture, and fixtures from paint splatters and damage. Follow these steps to ensure your workspace is ready:
- Clear the Room: If possible, remove all furniture, decorations, and other items from the room. This will give you more space to work and prevent accidental spills or splatters on your belongings.
- Protect the Floors:
- Drop Cloths: Cover the entire floor with drop cloths or plastic sheeting to protect it from paint spills and drips. Secure the edges with painter’s tape to prevent the cloths from shifting as you work.
- Tape Edges: If you’re working near baseboards or carpet, use painter’s tape to secure the drop cloth along the edges to ensure full coverage.
- Cover Furniture: If you can’t remove all the furniture, move it to the center of the room and cover it with plastic sheeting or old sheets. Make sure the covering is secure and completely shields the furniture from paint.
- Protect Fixtures:
- Light Switches and Outlets: Remove or cover light switch plates and outlet covers with painter’s tape to protect them from paint. If you can remove them, do so, and then cover the exposed switches or outlets with tape.
- Ceiling Fixtures: If you’re painting the walls, cover ceiling fixtures like fans or lights with plastic sheeting. Use painter’s tape to secure the covering and prevent any paint from getting on the fixtures.
- Mask Off Areas: Use painter’s tape to mask off trim, windows, door frames, and any other areas that you don’t want to paint. Press the tape down firmly to ensure crisp, clean lines when you remove it after painting.
- Ventilation: Ensure the room is well-ventilated by opening windows or using fans. Good ventilation helps paint dry faster and reduces the inhalation of fumes.
By carefully prepping the room, you’ll protect your space and belongings, making the painting process smoother and more efficient.
FAQs
How long should I wait after cleaning walls before painting?
After cleaning your walls, it’s important to wait until they are completely dry before applying paint. The drying time can vary depending on factors like humidity, temperature, and the cleaning solution used. Generally, you should wait at least 24 hours to ensure the walls are thoroughly dry. If you’re in a hurry, using a fan or a dehumidifier can help speed up the drying process. Painting on damp walls can lead to issues like poor adhesion, bubbling, and an uneven finish.
What should I do if I find mold during wall preparation?
If you discover mold during wall preparation, it’s crucial to address it immediately before continuing with your painting project. Follow these steps:
- Wear Protective Gear: Put on gloves, a mask, and safety goggles to protect yourself from mold spores.
- Clean the Mold: Mix a solution of one part bleach to three parts water. Apply it to the moldy area with a sponge or cloth, and scrub gently.
- Rinse and Dry: Rinse the area with clean water and allow it to dry completely. Use fans or a dehumidifier to speed up the drying process.
- Apply a Mold-Resistant Primer: Once the area is dry, apply a mold-resistant primer to prevent future mold growth.
- Inspect and Address: Consider investigating the source of the moisture that caused the mold and take steps to fix it, such as improving ventilation or repairing leaks.
Can I skip priming if my walls are already painted?
While it may be tempting to skip priming if your walls are already painted, it’s generally not recommended. Priming is essential for:
- Ensuring Even Coverage: Primer helps cover any imperfections and provides a uniform surface for the new paint.
- Improving Adhesion: Primer enhances the paint’s ability to stick to the surface, reducing the chances of peeling or chipping.
- Blocking Stains: If your walls have stains or are painted in a dark color, primer will prevent these from bleeding through the new paint.
If the existing paint is in excellent condition, a high-quality paint-and-primer-in-one product might be sufficient, but in most cases, applying a separate primer is the best practice for achieving a professional finish.
What grit of sandpaper should I use for sanding walls?
The grit of sandpaper you use depends on the condition of your walls and the stage of preparation:
- Medium Grit (120-150): Use medium-grit sandpaper for initial sanding to smooth out rough areas, remove old paint, or sand down spackle or joint compound.
- Fine Grit (220-240): Fine-grit sandpaper is ideal for finishing touches. It smooths out minor imperfections and prepares the wall surface for priming and painting without leaving visible scratches.
Always start with a coarser grit if there are significant imperfections, and then move to a finer grit for a smooth, ready-to-paint surface.
How can I tell if my walls are completely dry before painting?
To determine if your walls are completely dry, use the following methods:
- Touch Test: Gently touch the wall with your hand. If it feels cool or damp to the touch, it’s not dry yet.
- Visual Inspection: Look for any signs of moisture, such as darker patches or areas that appear different from the rest of the wall.
- Humidity Test: In high-humidity environments, even if the walls feel dry, they may still hold moisture. Use a hygrometer to check the humidity level in the room. If it’s above 50%, it’s advisable to wait longer or use a dehumidifier to reduce moisture.
- Tissue Test: Tape a small piece of clear plastic or a dry tissue to the wall and leave it for several hours. If moisture forms on the underside of the plastic or if the tissue becomes damp, the wall is not fully dry.
Ensuring that your walls are completely dry before painting is essential for a smooth, durable finish.